
You pick up the pot and your stomach drops.
The cactus that looked solid last week now leans a little. The base seems dull instead of firm. Maybe the color has gone off, or the body gives slightly when you touch it, and that single moment is enough to send you into the usual spiral: Did I overwater it? Is it sun stress? Is it already too late?
That reaction makes sense. Cacti are supposed to be the easy ones, the survivors. When one starts collapsing, it feels less like routine plant care and more like emergency medicine.
The good news is that cactus root rot treatment is often straightforward once you stop guessing and start looking for the right clues. Root rot isn't a moral failure and it isn't rare. It's a very common result of moisture lingering where a cactus needs air, especially around roots and the base.
What matters now is staying calm and being honest about what you find. Some plants can be rescued with a clean cut, a dry pause, and a fresh restart. Some can't. The hard part is telling the difference without wasting precious time.
This is the kind of problem you solve with your eyes, your fingers, and sometimes your nose. Rot has a look, a feel, and often a smell that healthy tissue does not. Once you know those signs, the panic drops and the decision-making gets much easier.
That Sinking Feeling When Your Cactus Looks Off
A sick cactus rarely announces itself dramatically at first. It usually starts with something subtle. The plant looks tired. It seems a bit yellow near the base. It wobbles when it used to sit rigidly in the pot. You touch it, expecting that dry, confident firmness, and instead you get a faint softness that shouldn't be there.
That's the moment when many individuals hesitate, and I understand why. Nobody wants to unpot a plant, cut roots, or slice into the base unless they're sure. But waiting too long is often what turns a manageable rot problem into a total loss.
What that first warning usually feels like
Root rot often creates a mismatch between the top of the plant and the hidden part below. The cactus may still look almost normal from a distance, but up close the signals start stacking up:
- The body feels unstable. A cactus that suddenly rocks in its pot often has a failing root system.
- The lower stem looks tired or discolored. Trouble commonly shows near the soil line first.
- Growth seems stalled. Even in active season, the plant can sit there doing nothing because damaged roots can't support it.
- The texture changes before the color fully changes. A healthy cactus has tension in its tissues. A rotting one often feels padded, weak, or oddly hollow.
Practical rule: If a cactus is getting softer and less anchored at the same time, assume the root zone needs inspection.
There's also an emotional side people don't talk about enough. A favorite cactus often carries years of slow growth. It may have survived moves, bad windows, forgotten waterings, and all the usual learning curve. So when it starts failing, the instinct is to be gentle. Sometimes gentle is exactly wrong. Rot rewards delay.
What helps is treating the problem like plant surgery instead of plant mourning. You're not ripping it apart. You're checking whether there's enough healthy tissue left to work with. That shift matters because it gives you a job to do.
Is It Really Root Rot A Definitive Diagnosis
A cactus with root rot often gives itself away before you make the first cut. The plant feels wrong. It may wobble in the pot, lean without a clear reason, or look dull and tired near the soil line even while the upper body still seems decent.

Start with the pattern, not a single symptom
Color change alone is not enough. Sun stress, old age, cold damage, and nutrient issues can all shift a cactus away from its normal tone. Root rot shows up as a pattern of decline. The base starts losing firmness, the plant stops anchoring well, and the lower tissues often look washed out, bruised, or slightly translucent.
Yellowing is one common clue, especially when it begins low on the plant. If you need to compare rot-related yellowing with other causes, this guide on why a cactus may be turning yellow helps sort that out.
Moisture meters can help, but only if you read them with some caution. A pot can feel dry on top while the bottom stays wet long enough to damage roots. This guide on expert advice for moisture meter use explains how to read those results in a way that matches what is happening in the root zone.
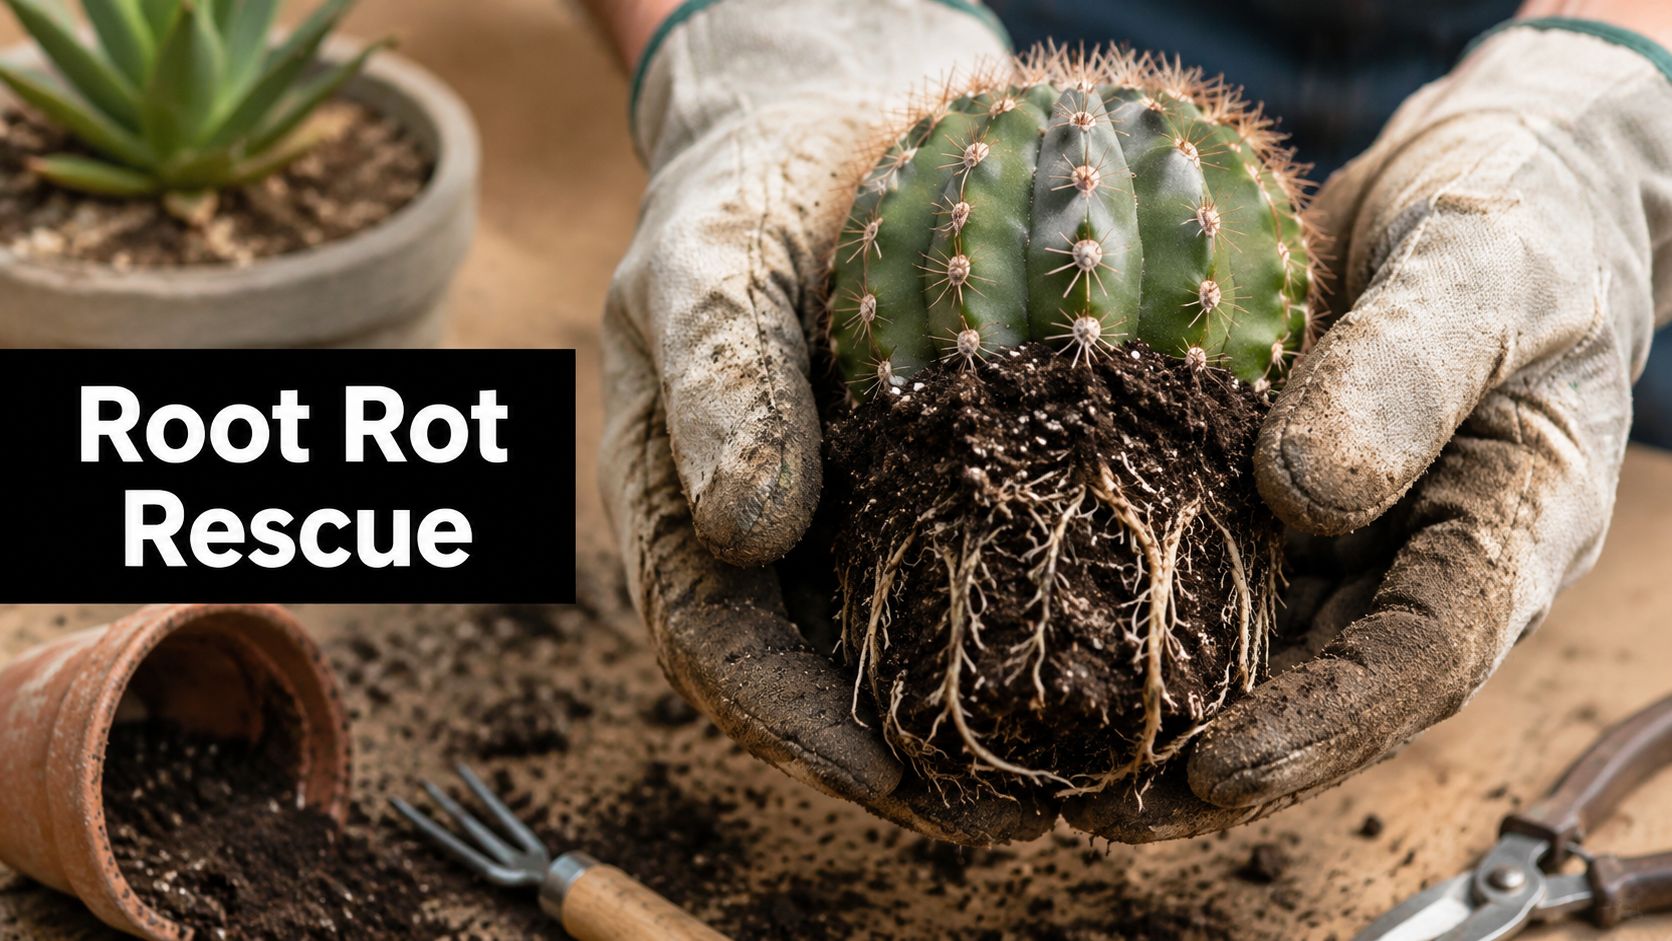
Then unpot it and trust your senses
Slide the cactus out carefully and clear enough mix away to inspect the roots and the base of the stem. This is the moment when diagnosis becomes much less guesswork.
Healthy roots feel springy and slightly tough. They hold together when you touch them. Rotted roots do the opposite. They feel mushy, limp, or oddly hollow, and the outer layer may slip off between your fingers, leaving a thin inner thread behind.
The smell matters too. Healthy cactus roots smell like barely damp soil, or like nothing at all. Rot has a stale, sour, swampy smell. Sometimes it is faint. Sometimes it is unmistakable the second the root ball comes free. If you catch that fermented or stagnant note, pay attention.
| Root condition | What it looks like | What it feels like | What it smells like |
|---|---|---|---|
| Healthy roots | Pale, white, or light tan; intact | Firm, wiry, resilient | Little to no smell, just clean soil |
| Rotted roots | Brown or black; collapsed; sometimes slimy | Mushy, papery, weak, or sloughing off | Sour, swampy, stale, or foul |
A discolored root can still be alive if it stays firm. A dark root that smears when pressed is finished. That difference is easy to miss if you only look and do not touch.
The point of no return checklist
Gardeners often want a yes or no answer here because the decision can feel heavy, especially with an older plant. The useful question is simpler. Is there enough clean, firm tissue left to save?
Give up on the original root system if you find most of these signs:
- roots are black or brown through most of the ball
- roots collapse or peel when handled
- the base of the cactus is soft above the soil line
- the smell is sour or foul after the old mix is removed
- there are no firm, pale roots left to work with
- the rot has climbed into the main stem in a full ring
If the damage is limited to some roots and the stem base still feels solid, treatment is usually worth it. If the stem is soft well above the base, or the plant has turned to mush around the entire circumference, recovery chances drop fast. At that stage, the practical choice is often to salvage any clean top growth if the species allows it, or let the plant go.
That is the hardest call in cactus care. It also prevents a lot of wasted time and false hope.
Emergency Surgery The Step-by-Step Treatment Plan
Rot confirmed. Now the job is simple to describe and hard to do calmly. Cut away everything the plant cannot recover from, protect what is still firm, and keep the fresh wound dry and clean.
A rushed hand does more damage than rot sometimes does. Set up first, then start cutting.

Set up like you're doing real surgery
Use a sharp knife or pruners, paper towels, a trash bag for infected material, fresh cactus mix, and a clean pot with a drainage hole. Keep extra blades or rubbing alcohol nearby so you can clean the tool between cuts if you hit obviously rotten tissue.
If you plan to reuse the old pot, scrub off every bit of old soil first and sanitize it before the plant goes back in. Old debris is enough to carry trouble into the next round.
The reason growers get strict about cleanliness is straightforward. Root and stem rots can be caused by several different organisms, and they all take advantage of wet wounds and contaminated surfaces. You do not need to identify the exact culprit before surgery. You do need to stop giving it a place to spread.
Strip away the old mix so you can read the plant
Get the root ball fully exposed. Tease away dry mix with your fingers. If the soil is stuck in a wet mass, rinse it off gently so you can see the crown, the roots, and the lower stem clearly.
This part smells before it looks bad in severe cases. Healthy roots and stem bases smell like dust or clean potting mix. Rot often has a sour, stale, swampy smell that clings to your hands and towels. Once you have smelled it a few times, you stop second-guessing what your eyes are seeing.
Pay attention to feel too. Good tissue has spring and resistance. Bad tissue smears, caves in, or peels away in layers. That tactile check matters because some roots look ugly but stay firm enough to keep, while others look only slightly off and collapse the moment you touch them.
Cut until the tissue is clean, firm, and dry-looking
Start with the obvious losses. Remove black, brown, mushy, hollow, or papery roots. Then inspect the base of the cactus. If the rot has entered the stem, keep cutting upward in thin slices until the cross section is uniformly firm with no brown ring, wet patches, or translucent areas.
Many gardeners stop one cut too early because the plant is getting smaller and the decision feels harsh. That hesitation is where rescues fail. If the blade passes through tissue that feels damp or soft, or if the cut surface looks tea-stained instead of fresh and solid, cut again.
Sometimes the right call is to abandon the entire root system and save the top as a cutting. That is not a setback. It is often the cleanest rescue.
A practical tip helps here. Wipe the blade after each pass. If the residue on the blade looks brown and watery, assume you are still in infected tissue.
Use treatments selectively
After cutting, some growers dust the wound with sulfur or use a labeled fungicidal product suited to the problem they suspect. Others skip chemicals and rely on aggressive removal, drying, and clean repotting. Both approaches can work.
The trade-off is precision. A targeted product can help in the right situation, but random spraying does not fix tissue you failed to remove. Home growers usually get better results from cleaner cuts, dry healing time, and fresh materials than from guessing with a bottle.
If you need a refresher on handling the plant after cutting, this guide on how to repot cacti without damaging the roots or stem covers the mechanics well.
A quick demonstration of the physical cleanup process can help before you make cuts:
The mistakes that kill the plant after the cutting is done
A cactus usually does not die because the surgery looked dramatic. It dies because one of a few avoidable problems is left in place.
- Old soil goes back in the pot. Fresh mix only.
- One soft patch gets spared. That patch becomes the next center of rot.
- The plant is watered before the wound has sealed. Moisture plus a fresh cut is a bad combination.
- Dirty containers or tools are reused. Clean-looking is not the same as clean.
- The grower keeps a plant with no firm base left. At that point, salvageable top growth is the only realistic option.
The hard truth is that successful surgery often looks severe. A smaller cactus with clean tissue has a real chance. A fuller cactus with hidden rot usually does not.
The Road to Recovery Repotting and Aftercare
The cutting is done. Now patience decides whether the cactus gets a second chance.

Let the wound dry before anything else
Fresh cuts need air, not comfort. Expert guidance recommends allowing the wound to dry in open air for 3 to several days before replanting so a callus can form, and it also notes that fungicide or bactericide should only be applied after the cut has dried because treating a wet cut can trap pathogens, as shown in this specialist cactus aftercare guidance.
That drying period can feel wrong if you're used to “helping” stressed plants immediately. Resist that urge. A callus is the cactus building its own barrier.
Set the plant in bright light with good airflow. Keep it out of harsh conditions that add stress, but don't tuck it into a dark corner. Dry, airy, and stable is the target.
A cactus that has just been cut doesn't need sympathy water. It needs time to seal itself.
Repot for drainage, not decoration
Once the cut end is dry and hardened, repot into a clean container with a drainage hole and fresh, well-draining cactus mix. Keep the plant stable, but don't bury the stem deeper than necessary just to make it stand upright.
If you want a broader walkthrough on container choice and planting depth, The Cactus Outlet has a straightforward guide on how to repot cacti.
A few practical choices matter here:
- Use a clean pot. New is easy. Reused is fine only if it has been properly cleaned.
- Choose a gritty mix. Dense moisture-holding soil is how many of these problems start.
- Prioritize airflow around the root zone. Recovery roots need oxygen as much as they need eventual moisture.
Wait longer than your nerves want you to
After repotting, withhold water until the new mix is fully dry, following the same expert guidance linked above. That waiting period feels uncomfortable because the plant looks vulnerable, but watering a freshly treated cactus before it has re-established is often the mistake that undoes the whole rescue.
Some growers use rooting gel and repot immediately after cutting. Without that, leaving the base to dry first is the safer route according to the same specialist demonstration. In plain terms, dry tissue handles re-entry into soil much better than wet tissue does.
Recovery doesn't look dramatic. The first sign of success is often nothing happening. No spreading softness. No new odor. No worsening discoloration. In cactus rehab, boring is good.
How to Prevent Cactus Root Rot from Returning
You prevent repeat rot by changing the conditions that made the first infection easy.

Prevention is a growing setup, not a single trick
Cactus rot usually comes back for predictable reasons. The roots stay wet too long. The pot holds more moisture than the plant can use. Old soil, dirty tools, and reused containers add one more problem to a stressed root system.
Healthy roots have a clean, earthy smell and a springy feel when you handle them. Trouble starts long before the whole plant collapses. The mix stays cool and damp deep in the pot. The base of the cactus feels a little softer than it should. There may be a sour smell near the drainage hole, or a musty odor when you tip the plant out. Those small sensory warnings matter. Catching them early is how growers avoid another round of surgery.
The habits that change outcomes
- Water on dryness, not on schedule. If the root zone is still cool or faintly damp below the surface, wait.
- Use a gritty mix that dries fast and stays airy. If the soil clumps into a heavy ball after watering, it is holding too much.
- Plant in a pot with a drainage hole. Water needs a way out every time.
- Clean tools, pots, and work surfaces before reuse. Rot organisms do not need much help to spread.
- Check the base of the plant and the smell of the soil. Softness, sourness, or a swampy odor are early warnings, even if the cactus still looks decent from above.
- Adjust for season and light. A cactus in low light or cool weather uses water slowly. Treating winter and summer the same is how many roots stay wet too long.
One more practical point. A rescued cactus is easier to overcare for than to neglect. People get nervous, water too soon, and restart the problem.
What growers mistake for prevention
Surface gravel does not fix dense soil below it. A bigger pot does not help if the extra mix stays wet around a reduced root system. Watering lightly every few days is often worse than watering thoroughly and then waiting for the mix to dry.
Good prevention feels a little restrained. The plant is firm. The pot dries at a steady pace. The soil smells clean. Nothing at the base feels tacky, slick, or suspicious when you check it.
If you are restarting from a healthy piece after rot, a clean cutting gives you better odds than trying to save questionable tissue. This guide on propagating cactus from clean cuttings after damage is the right next step for salvageable material.
When to Say Goodbye and What to Do Next
Some cacti can be cut back and restarted. Some are already gone by the time they're opened up. Being able to tell the difference is part of becoming a better grower.
The point of no return checklist
It's usually time to let go when you find any of these:
- The entire root system has collapsed and the rot has progressed far into the stem
- There is no firm, healthy tissue left to cut back to
- The core is discolored, wet, or mushy all the way through
- The whole plant smells foul and falls apart when handled
- Every possible cutting point shows active internal rot
That decision can feel harsher than it is. Keeping a dead or dying cactus on the bench because you can't bear to toss it doesn't honor the plant. It just drags out the frustration.
If a healthy top section remains, you may still be able to start over by taking a clean cutting and following a proper propagation process. This guide on how to propagate cactus from cuttings is a good next step if you're working with salvageable material.
Losing a cactus teaches faster than easy success does. After one encounter with rot, most growers become much better at reading texture, odor, and moisture before trouble gets far.
If you're replacing a plant, expanding your collection, or looking for more cactus care guidance, The Cactus Outlet offers cactus varieties along with practical growing information to help you start cleaner and grow with fewer avoidable problems.