
So, you’ve noticed some strange white spots on your aloe plant. It’s a common sight that can make any plant owner a little nervous, but don’t panic! Most of the time, it's your plant's way of telling you something in its environment is slightly off.
The good news is that the cause is usually one of five common culprits: pesky insects like mealybugs, a fungal problem like powdery mildew, mineral buildup from your tap water, a bit of sunburn, or just your plant's natural coloring. The trick is figuring out which one it is, and that’s easier than you think.
Why Your Aloe Plant Has White Spots
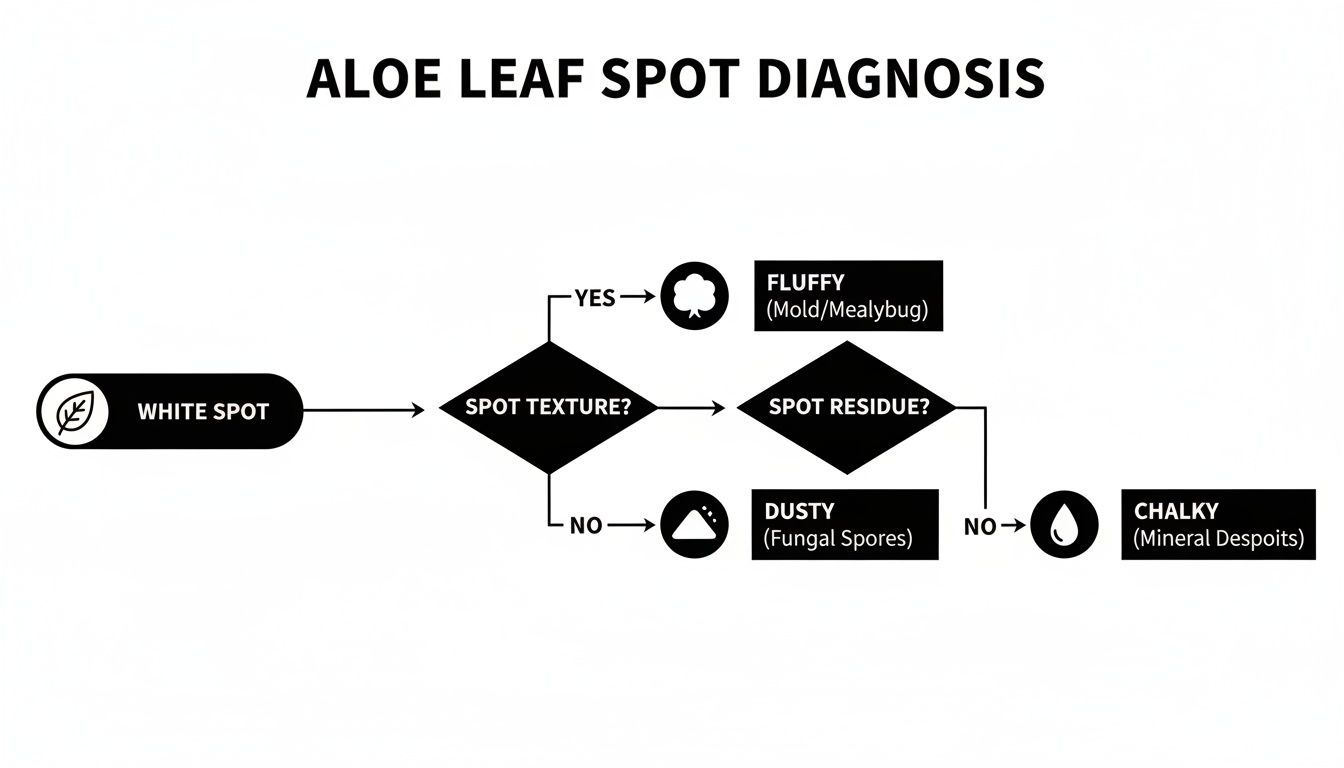
Before you grab any sprays or start moving your plant around, take a closer look. The texture and appearance of the spots themselves are your biggest clues. Think of yourself as a plant detective—a little observation goes a long way.
Here’s a quick rundown of what to look for:
- Fluffy or Cottony: If the spots look like tiny bits of cotton, you’re almost certainly dealing with sap-sucking pests like mealybugs.
- Dusty or Powdery: A fine, flour-like dusting that wipes off easily points straight to a fungal issue, usually powdery mildew.
- Chalky or Crusty: These hard, crusty deposits are left behind by minerals in hard tap water. They’re harmless but can be unsightly.
- Bleached or Faded: If the areas look pale and washed-out rather than distinctly white, your aloe is likely getting too much direct sun.
- Uniform and Un-removable: Are the spots part of the leaf's pattern? If they don’t rub or wash off, it’s probably just natural variegation—your plant's unique markings.
This simple process of elimination helps you zero in on the problem without any guesswork.
Quick Diagnosis Guide for White Spots on Aloe
To make it even simpler, here’s a table you can use as a quick reference. Just match what you see on your aloe with the descriptions below.
| What the Spots Look Like | Most Likely Cause | A Key Identifying Trait |
|---|---|---|
| Tiny, cotton-like tufts, often in crevices. | Pests (Mealybugs) | You might see a sticky "honeydew" residue. |
| A fine, dusty white powder on the leaf surface. | Fungus (Powdery Mildew) | The powder easily wipes off with your finger. |
| Hard, crusty white or light-gray residue. | Mineral Deposits | Spots are most common where water pools or evaporates. |
| Washed-out, pale, or yellowish-white patches. | Sunscald | Appears on the side of the plant facing the strongest light. |
| Consistent, flat spots integrated into the leaf. | Natural Variegation | The pattern is symmetrical and doesn't change or spread. |
This table helps you quickly narrow down the possibilities so you can focus on the right solution.
By learning to read these visual cues, you can avoid using the wrong treatment and get straight to helping your plant. Remember, once you've correctly identified the problem, you're already halfway to fixing it. And while white spots are a common sign, other issues can pop up. If you notice other discolorations, you can learn what to do when your aloe vera plant has brown spots in our other guide.
Dealing with Uninvited Guests: Mealybugs and Scale
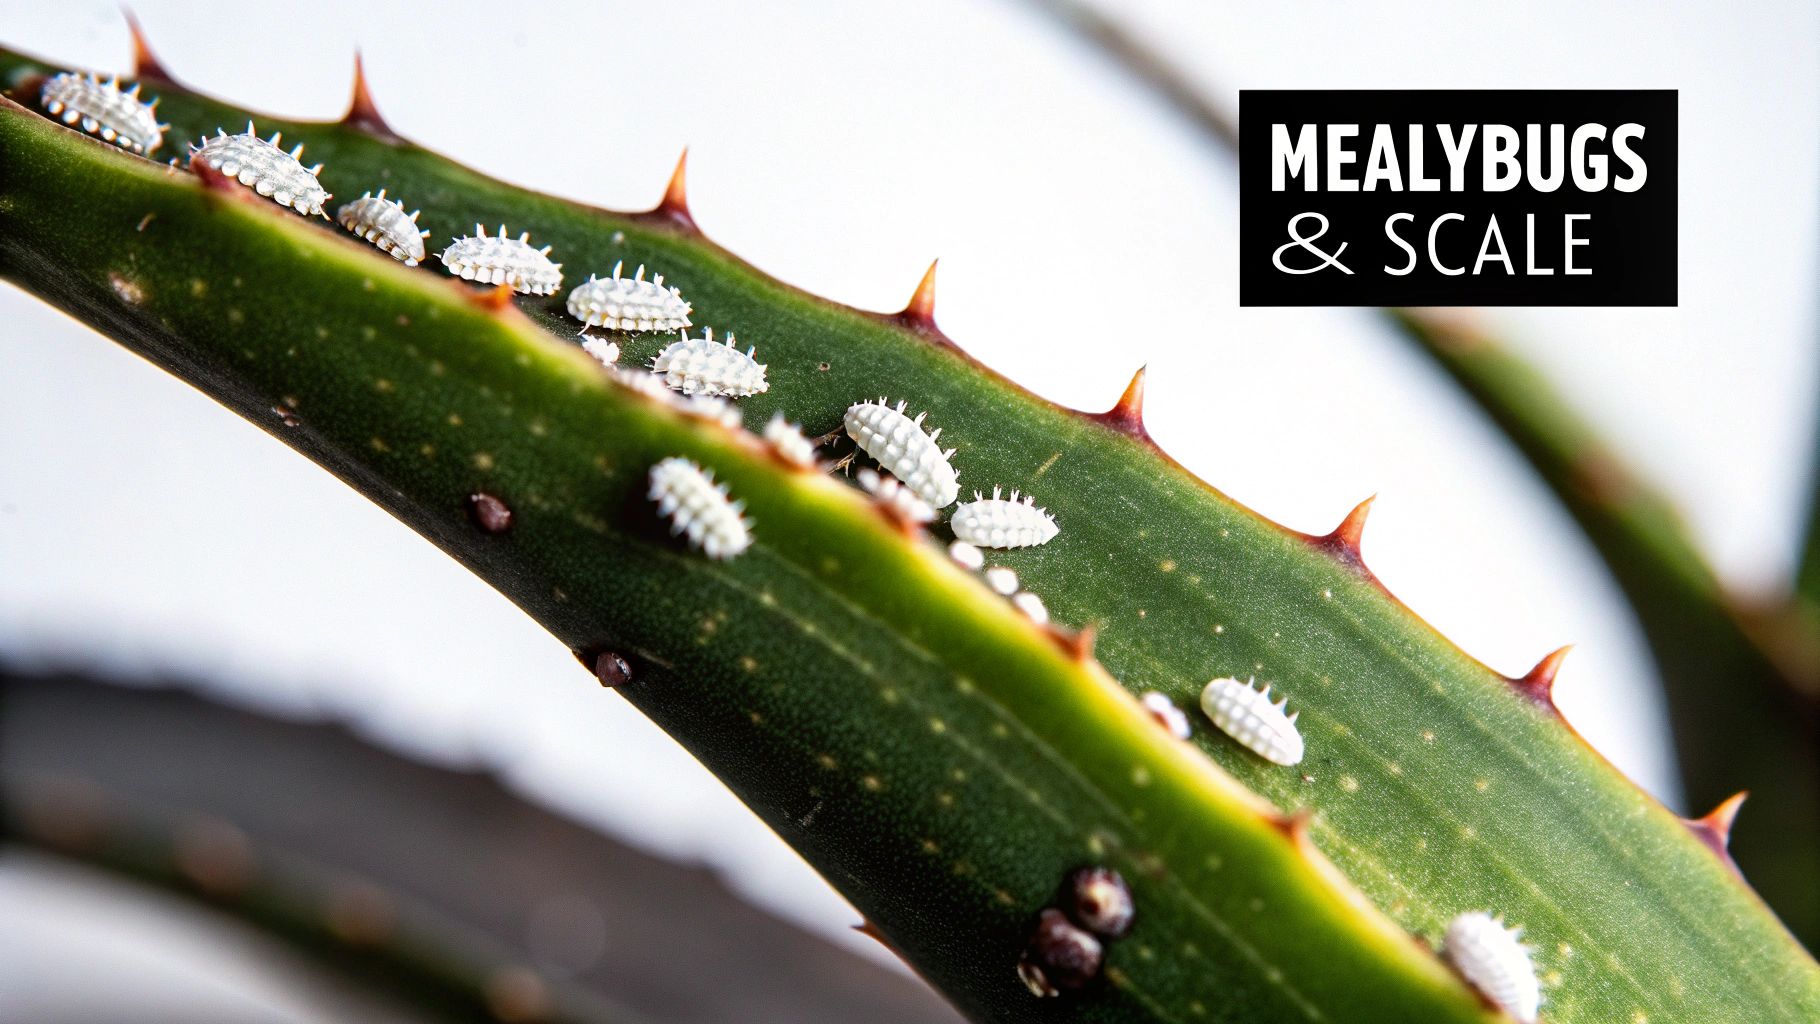
If those white spots on your aloe look more like tiny cotton balls than specks of dust, you've likely got some uninvited guests. These are common houseplant pests, usually mealybugs or scale, and they're a top reason for mysterious white markings. Don't panic—think of this as an eviction notice, not a crisis. Getting rid of them is totally manageable.
Mealybugs are the usual suspects. These are tiny, sap-sucking insects that build themselves a waxy, white, fluffy home. It looks just like a tiny piece of cotton. They love to wedge themselves into the tight, protected spots on your aloe, especially down in the crevices where the leaves join the main stem. You might also spot a clear, sticky residue on the leaves. That's "honeydew," and it's a dead giveaway that pests are around.
Scale insects are another possibility, though they have a different look. These pests show up as small, hard, oval-shaped bumps clinging tightly to the leaves. While many are brown or tan, some species sport a whitish, waxy shell. A good test is to try flicking one off with your fingernail—if it comes off, it’s likely scale, not a natural part of the plant.
Your Step-by-Step Pest Removal Plan
The best way to tackle these pests is with a targeted approach. Think surgical strike, not a full-on assault. For a small infestation, this method is incredibly effective and won't stress out your aloe.
-
Isolate Your Plant: First thing's first: get that aloe away from your other houseplants. Mealybugs and scale are notorious for spreading, and setting up a quarantine zone will stop a minor issue from turning into a full-blown infestation.
-
Perform Targeted Removal: Grab a cotton swab or a soft cloth and dip it in 70% isopropyl alcohol (your standard rubbing alcohol). Carefully dab and wipe away every single white spot and bump you can find. The alcohol cuts right through their waxy protective layer, killing them on contact without damaging the aloe’s tough leaves.
-
Treat the Entire Plant: Pests are sneaky. After you've spot-treated, it’s a good idea to spray the whole plant with an insecticidal soap or a natural remedy. When it comes to pests like mealybugs and scale, a great natural option is detailed in this guide on neem oil for plants. A good, thorough spray will take care of any tiny nymphs or eggs you might have missed.
Pro Tip: Always test your spray on a small, hidden leaf first. Wait a full 24 hours to see how the plant reacts. This little step can save your aloe from potential leaf burn.
Staying Vigilant After Treatment
Winning the first battle is great, but now you need to prevent a second wave. Keep your aloe isolated for at least a few weeks after that initial treatment.
Give the plant a close look every few days, searching for any signs of a comeback. If you spot any stragglers, repeat the alcohol and soap treatment once a week. Once you're certain the plant is completely pest-free, you can move your healthy aloe back with its friends. This methodical process ensures those uninvited guests are gone for good.
Identifying and Treating Fungal Infections
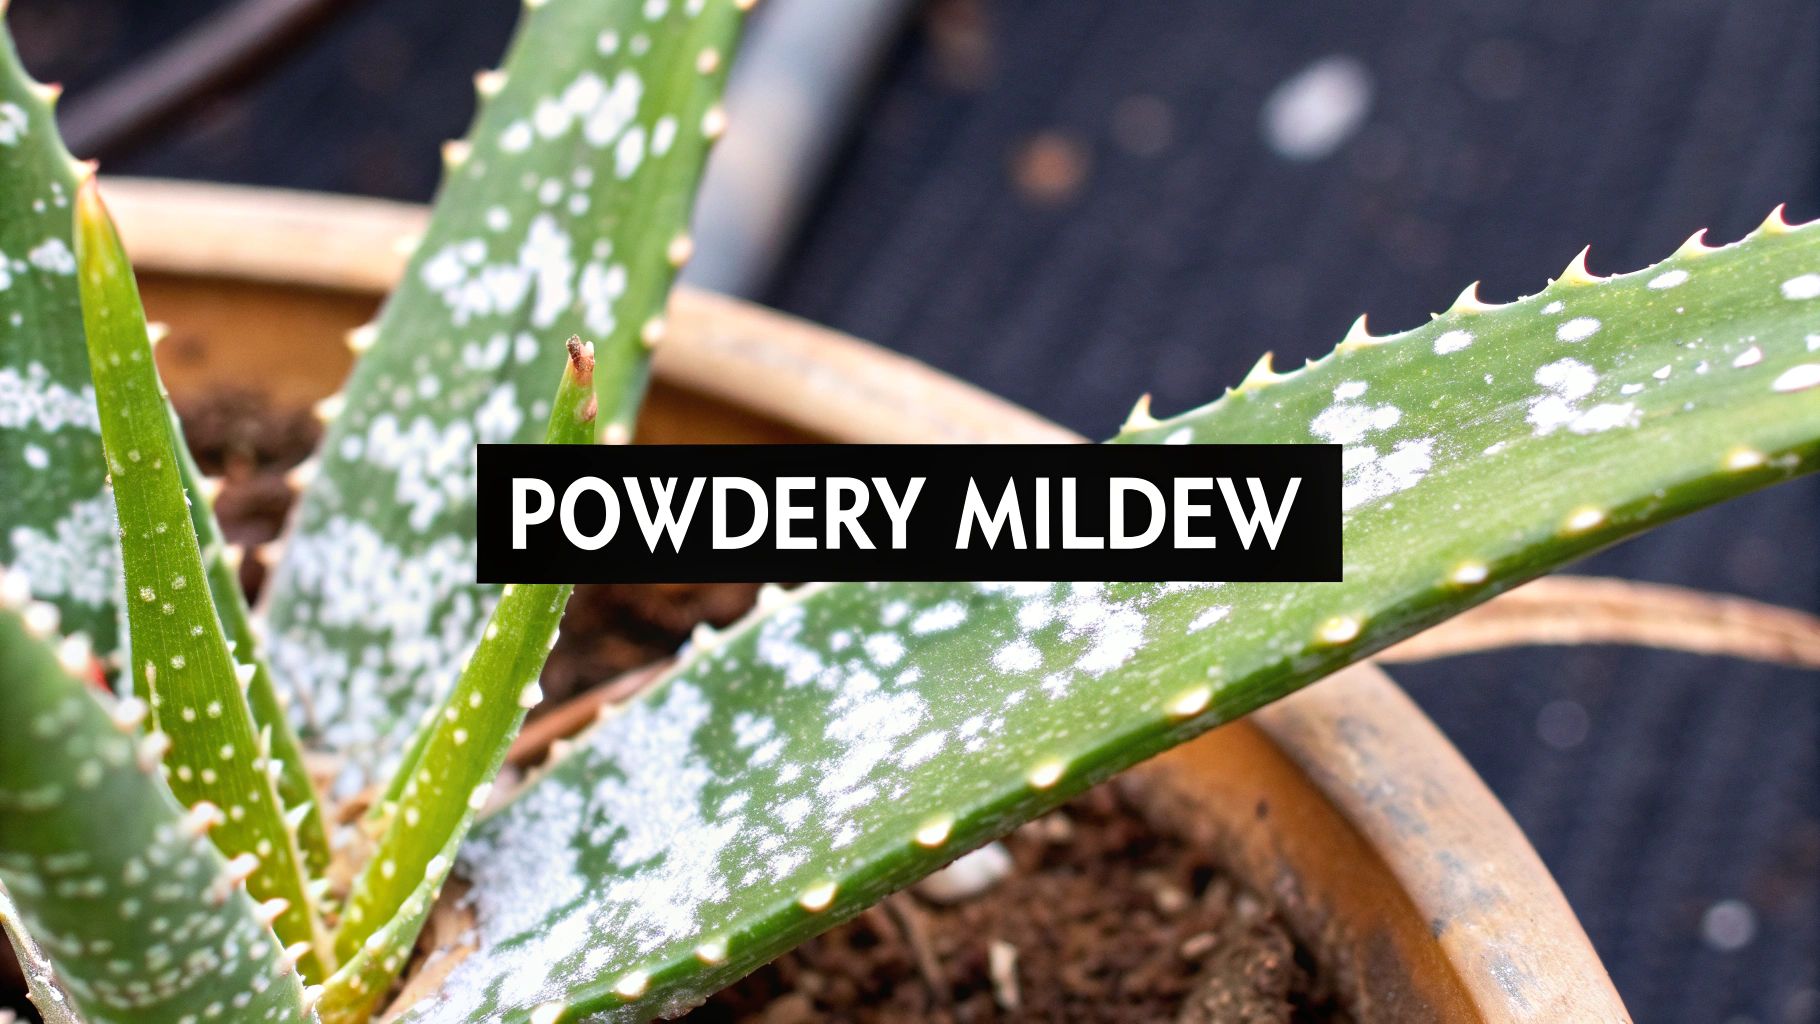
If the white spots on your aloe look less like tiny bugs and more like a dusty, flour-like coating, you're probably dealing with a fungal infection. The most common culprit is powdery mildew. This fungus loves the exact conditions often found indoors: still air, moderate temperatures, and a bit too much humidity.
Think of your plant's little corner of the world as its own micro-environment. If the air is stagnant and damp, you’ve basically rolled out the welcome mat for fungal spores. These microscopic invaders land on your aloe’s leaves and start to multiply, creating those tell-tale dusty white patches that can quickly spread.
Unlike pests that suck the life out of the plant, this fungus sits on the surface, essentially smothering the leaves. It blocks sunlight and gets in the way of photosynthesis. If you let it go, the fungus will weaken your aloe, stunt its growth, and open the door for other problems to sneak in.
Confirming a Fungal Issue
Figuring out if it's powdery mildew is usually pretty straightforward. Go ahead and touch the spots—if they have a powdery or fuzzy feel and wipe away easily, you've found your culprit. You'll often see a slightly discolored or yellowish patch on the leaf underneath. This is a dead giveaway, separating it from the crusty texture of mineral deposits or the built-in patterns of natural variegation.
Don't underestimate how quickly a fungal issue can get out of hand. In one greenhouse study on a fungus called Nigrospora oryzae, which also causes white spots, the disease incidence hit an astonishing 50-60%. It affected up to half the leaves on every single infected plant. That just goes to show how fast these problems can explode in the wrong conditions.
An ounce of prevention is worth a pound of cure. For fungal infections, this means disrupting the environment where they thrive. The goal is to turn your plant's space from a fungal paradise into a fortress of health.
Your Action Plan for Fungal Treatment
Once you're sure it's a fungus, it's time to get to work. The plan is twofold: get rid of the visible mildew and, just as importantly, change the environment so it can't come back. Overwatering is a huge contributor here, as it raises humidity and can cause other disasters. To learn more, check out our guide on how to spot and treat aloe vera plant root rot.
Here's your step-by-step guide to kicking that fungus to the curb:
- Isolate the Plant: First things first. Just like with pests, move your infected aloe far away from its plant friends. This keeps the spores from drifting through the air and starting a new colony.
- Improve Air Circulation: This is the most important step, hands down. Give your plant some breathing room by moving it to a less crowded spot. You can even use a small fan on a low setting for a few hours a day to keep the air moving gently around the leaves.
- Wipe Away Visible Fungus: Grab a soft, damp cloth and gently wipe down the leaves. This physically removes a huge amount of the powdery mildew and gives you a clean slate to start treatment.
- Apply a Fungicide: You don't need harsh chemicals. A simple homemade spray works wonders. Just mix one teaspoon of baking soda and a half-teaspoon of mild liquid soap into one quart of water. Spray the entire plant—tops and bottoms of the leaves—until it's dripping. The baking soda makes the leaf surface alkaline, which fungus absolutely hates.
If the infection is being stubborn, neem oil is another fantastic organic choice. Whichever you use, be sure to reapply the treatment every 7-10 days until every last sign of mildew is gone for good. By cleaning the plant and fixing its environment, you're not just fighting this infection—you're making sure a new one never gets the chance to start.
Decoding Environmental and Water-Related Spots
Not every white spot on your aloe is a sign of a pest invasion or a nasty fungal infection. Sometimes, the plant is just reacting to its surroundings—specifically, the light it's getting and the water you're giving it. The good news? These issues are usually the easiest to fix, often just needing a simple tweak to your care routine instead of a full-blown treatment plan.
The two most common culprits here are sunscald and mineral buildup. You can think of sunscald as a sunburn for your aloe; it happens when the plant is suddenly blasted with too much intense, direct sunlight. Mineral buildup, on the other hand, is just like that chalky residue you see on your faucets, a souvenir left behind by hard tap water.
Sunscald: A Plant's Sunburn
While aloes absolutely love bright light, throwing them from a cozy, dim indoor corner straight into the harsh summer sun is a recipe for shock. This sudden change can cause sunscald, leaving bleached, faded, or even yellowish-white patches on the leaves. Unlike other spots, these are actually part of the leaf tissue and you can't just wipe them away.
The damage on those specific leaves is permanent, but it’s not a death sentence for your plant. The real trick is helping your aloe adjust without causing more stress.
- Move it Back: The first thing you should do is get your aloe out of the line of fire. Find a spot with plenty of bright, indirect light—an east-facing window is usually a great choice.
- Acclimate Slowly: If your goal is to get it used to more sun, you have to do it gradually over a week or two. Start with just an hour of direct morning sun, then slowly increase the time each day.
This gentle transition gives the plant’s cells time to adapt, preventing any more "sunburn" and ensuring new growth comes in healthy. Over time, the plant will shed the old, damaged leaves as fresh ones emerge from the center.
The goal isn't to reverse the damage but to stop it from happening again. Think of it as teaching your plant to tan safely rather than letting it get burned.
Mineral Buildup From Hard Water
What if the white spots are crusty, almost chalky, and you can scrape them off with your fingernail? You’re almost certainly looking at mineral deposits. This is incredibly common for anyone using regular tap water, which is often loaded with dissolved minerals like calcium and magnesium. When you water the plant and the water evaporates, those minerals get left behind on the leaves and soil.
While these deposits aren't really harmful, they can look pretty bad. Stopping them is all about changing how you water. For home solutions, learning and understanding how water softeners combat hard water and limescale can provide broader insight.
For your aloe, the fix is much simpler:
- Wipe the Leaves: Take a soft cloth dampened with a bit of distilled water (a little lemon juice mixed in can help too) and gently wipe the spots away.
- Switch Your Water: The best long-term solution is to stop using tap water. Start watering with filtered, distilled, or even rainwater to eliminate the source of the minerals.
- Flush the Soil: Give the soil a good rinse once or twice a year to wash out any built-up salts. Just water the plant thoroughly with distilled water, let it drain completely, and then repeat the process a few more times.
Learning to Spot Healthy Aloe Variegation
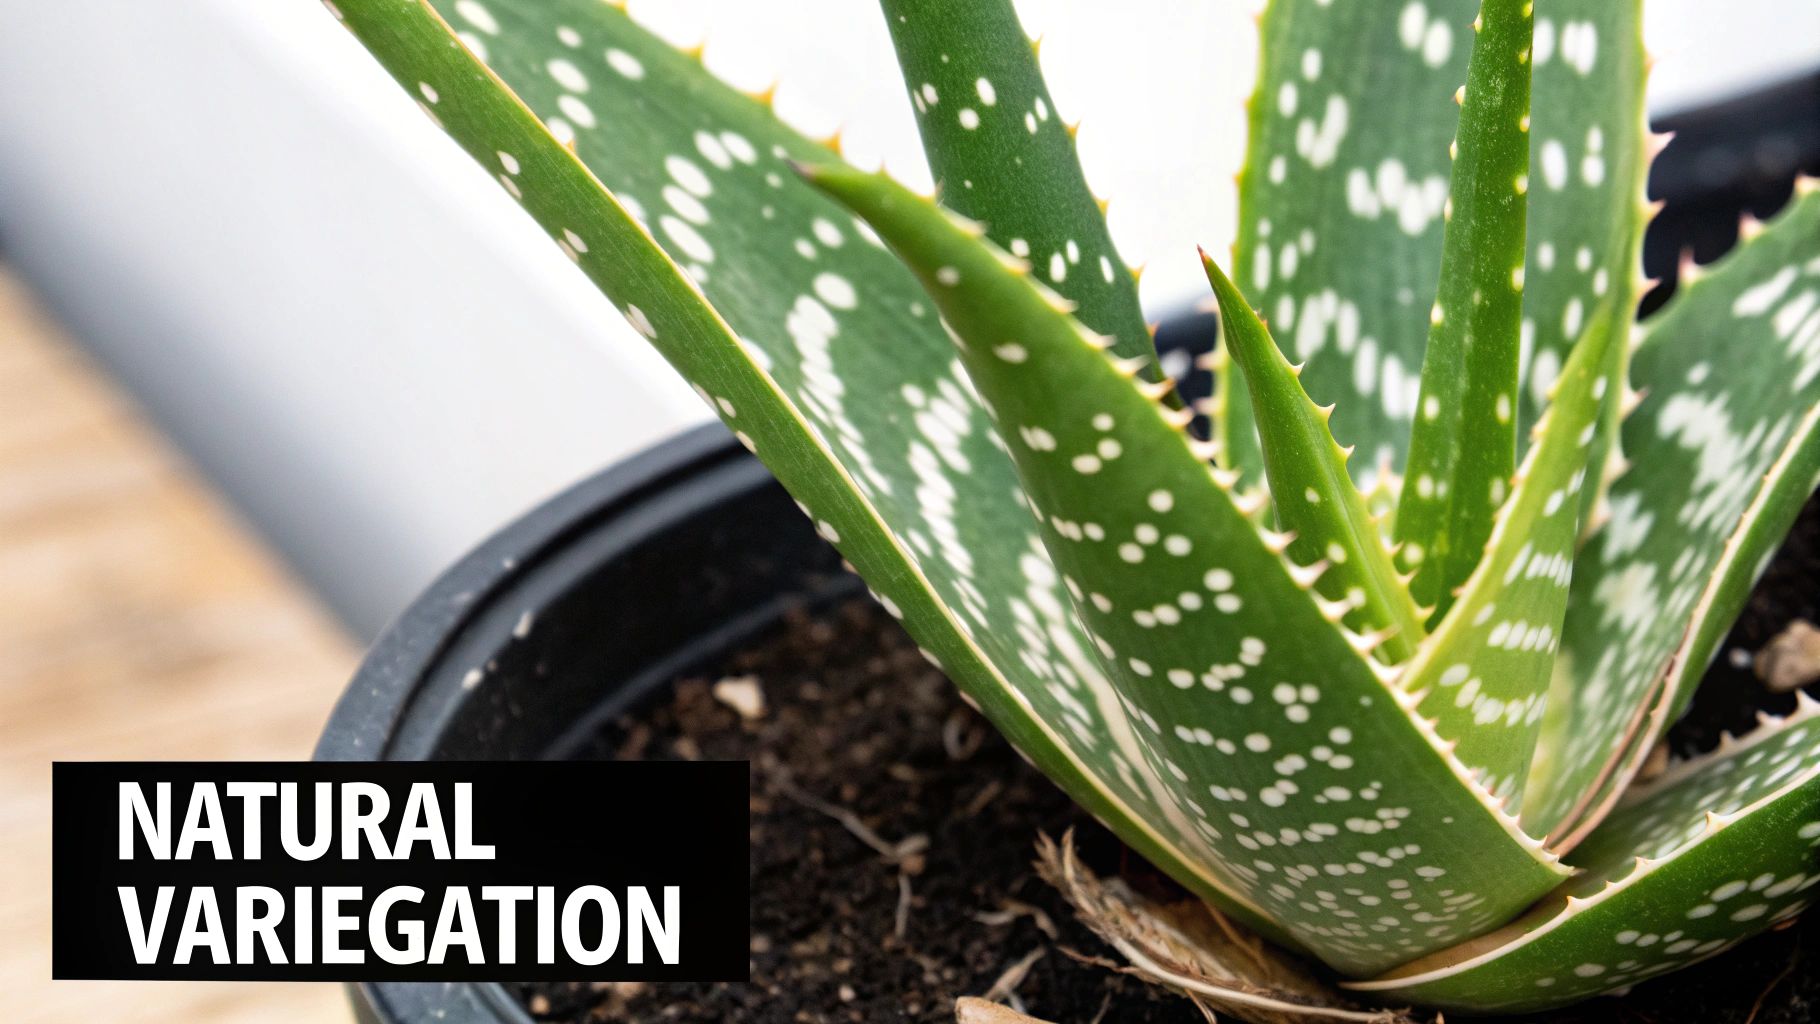
Before you grab the fungicide or start mixing up a remedy, take a deep breath and ask a simple question: what if those white spots are actually supposed to be there? It's a common point of confusion, but many popular aloe varieties are specifically cultivated for their striking white markings.
This natural coloration is called variegation, and it’s completely normal—part of the plant's genetic code. Think of these spots less like blemishes and more like freckles that give your aloe its unique personality. They’re part of the leaf tissue itself, so trying to "fix" them would be like trying to wash the stripes off a zebra.
Is It a Problem or a Pattern?
So, how do you tell the difference between a worrying symptom and a healthy, decorative pattern? The secret is in the texture and how the spots behave.
Here’s a quick way to check:
- Touch the spots: Gently run your finger over the white areas. Natural variegation feels perfectly smooth and flat, just like the rest of the leaf.
- Try to wipe them: Pests, mildew, or mineral buildup will feel raised, crusty, or sticky, and you can usually wipe or scrape them off. A natural spot won’t move.
The simplest test is often the most reliable: if you can't scrape it off, it's probably part of the plant. Problems like pests and fungi sit on the leaf's surface, while healthy variegation is in the leaf itself.
Learning to recognize these harmless patterns will save you a lot of worry and unnecessary treatments. These markings usually form a consistent pattern of dots, dashes, or stripes across the plant. If the white spots on your aloe look like they belong there—and they don’t rub off—you can relax. Your plant isn't sick; it’s just showing off.
Your Proactive Guide to Preventing Future Issues
Fixing the white spots on your aloe is one thing, but preventing them from ever coming back is the real goal. The secret is creating an environment where problems just can't get a foothold. A healthy, happy aloe is naturally tough and can shrug off most pests and diseases. It all comes down to turning a few basic care tasks into consistent habits.
I like to think of a plant's health as a three-legged stool: proper watering, the right amount of light, and good airflow. If any one of those legs is wobbly, the whole plant becomes unstable and an easy target for trouble. Getting these three things right is your best line of defense.
Perfecting Your Watering Technique
If there's one mistake I see over and over again with aloes, it's overwatering. These are desert plants, and they absolutely hate sitting in soggy soil. Your goal should be to copy their natural environment—a good drenching, followed by a long period of drying out.
- Embrace the 'Soak and Dry' Method: When it's time to water, give it a really good drink until water flows out of the drainage holes. But here’s the most important part: let the soil get completely dry before you even think about watering it again.
- Always Check the Soil First: Don't water on a schedule. The best tool you have is your finger. Stick it a couple of inches into the soil. If you feel even a hint of moisture, step away and check again in a few days.
A smart watering routine is non-negotiable for a healthy aloe. Damp soil is basically a welcome mat for root rot and fungal diseases, creating the exact conditions where problems thrive.
Optimizing Light and Airflow
Getting the light and air right is just as crucial as watering. Aloes crave bright, indirect sunlight. Too much direct sun will burn the leaves (sunscald), but too little light will weaken the plant and make it a sitting duck for pests.
Good air circulation is also your secret weapon, especially against fungal issues like powdery mildew that love still, humid air. In fact, research from commercial Aloe vera nurseries has shown a direct link between severe fungal outbreaks, high humidity, and poor drainage. You can read more about how critical environmental controls are in these findings on fungal disease prevention.
Sometimes, all it takes is giving your plant a little breathing room and not crowding it with other plants. For a complete rundown on creating the perfect home for your plant, you might want to check out our full guide on how to care for aloe vera plants. By making these simple tips a regular part of your routine, you'll be stopping problems long before they ever get a chance to start.
Frequently Asked Questions About White Spots on Aloe
Even after identifying the problem, you might still have a few lingering questions. Let's tackle some of the most common ones that come up when you're nursing an aloe back to health.
Can I Just Wipe the White Spots Off?
That really depends on what you're dealing with. If the spots are from mineral deposits, you can certainly wipe them away, but that doesn't solve the hard water issue. The same goes for powdery mildew—wiping it off is a start, but it won't fix the airflow problem that caused it.
When it comes to pests like mealybugs, wiping them off with an alcohol-soaked swab is a key part of the treatment. Just remember, this is only the first step. You still need to treat the plant to get rid of any eggs or tiny bugs you missed. Think of wiping as a temporary fix, not a cure.
Will the Damaged Leaves Ever Look Normal Again?
Unfortunately, no. Once a leaf is scarred from a pest infestation or bleached by sunscald, that damage is permanent. The plant tissue can't regenerate itself back to that perfect, healthy green.
The good news is that your focus should be on protecting the new growth. As your aloe pushes out fresh, healthy leaves from its center, the older, damaged leaves will eventually shrivel up. At that point, you can just snip them off.
A weekly check-up is a fantastic habit. A great time to do it is when you're checking if the soil is dry enough for watering. Make sure to peek under the leaves and deep into the crown—that's where pests love to hide. Catching an issue early makes all the difference.
At The Cactus Outlet, we provide a huge selection of healthy, thriving succulents and cacti to add to your collection. Find your next plant here.