
Welcome to one of the most rewarding aspects of keeping succulents: making more of them. If you’ve ever wondered how to turn one beloved plant into an entire collection, you’re in the right place. Growing succulents from cuttings is surprisingly straightforward. You just need to gently remove a leaf or a piece of the stem, let it dry out for a few days until a callus forms, and then set it on some soil to work its magic.
With a little bit of patience, you can turn one plant into many for practically free.
Why Bother Propagating Succulents?
Multiplying your collection is easily one of the most satisfying parts of owning succulents. Instead of constantly buying new plants, you can create them yourself. This gives you a never-ending supply for your home or to share with friends and family. It's a simple technique that not only saves money but also really deepens your connection to the plants you're nurturing.
A Hobby That Just Keeps Growing
The love for these tough little plants is no small thing. That enthusiasm has fueled some serious growth in the gardening world. The global succulent plant market was valued at around USD 5.08 billion and is expected to grow at a rate of roughly 17.1% each year. It just goes to show how incredibly popular these plants have become.
When you start propagating, you're not just gardening in a vacuum; you're plugging into a huge community of growers and collectors who share the same passion.
The Advantage of Using Cuttings
Propagating from cuttings is almost always faster and more reliable than trying to grow succulents from seed. You're essentially creating a clone of the parent plant, which guarantees you'll get a genetically identical copy. This is fantastic when you want to preserve the specific colors or shapes of a favorite plant.
There are two main ways to go about it, and knowing which one to use is the first step to success.
Comparing Leaf and Stem Cuttings at a Glance
Choosing the right propagation method often comes down to the type of succulent you're working with. Some plants, like Echeverias, are practically designed for leaf propagation, while others, like branching Jade Plants, do much better with stem cuttings. This table breaks down the key differences to help you decide which path to take.
| Attribute | Leaf Cuttings | Stem Cuttings |
|---|---|---|
| Best For | Rosette-forming succulents with fleshy leaves (Echeveria, Sedum, Graptopetalum) | Branching or vining succulents (Crassula, Senecio, Aeonium) |
| Speed | Slower; takes weeks to months to form a new plantlet. | Faster; the cutting is already a small plant that just needs roots. |
| Success Rate | Can be lower; not every leaf will sprout. | Generally higher, as the cutting has more stored energy. |
| Effort | Minimal; just twist off a leaf and let it sit. | Requires a clean cut and removing lower leaves. |
Ultimately, both methods are incredibly effective and rewarding. The best approach really just depends on your plant and your patience level!
The real beauty of propagation lies in its simplicity. You don't need a bunch of expensive equipment or a magical green thumb—just a healthy "mother" plant, a bit of patience, and the right know-how. It's a truly sustainable way to expand your indoor jungle.
As you start your journey of growing succulents from cuttings, you might find yourself looking for inspiration. Seeing a beautifully arranged pre-made succulent garden can spark some great ideas for what you can create with your new plant babies. The skills you're about to learn will give you the power to design stunning arrangements with the very plants you've grown from scratch.
Getting Your Propagation Gear Ready
Before you even think about snipping a single leaf or stem, let's get your workspace set up. Having everything you need within arm's reach makes the whole process smoother and, frankly, a lot more fun. This isn’t about needing a professional greenhouse setup; it’s just about having the right basics on hand to give your new plant babies the best shot.
You probably have most of this stuff lying around your house already. Think of it like setting up your mise en place before cooking—it just prevents scrambling and making mistakes later on.
The single most important tool in your kit is something sharp and sterile. A clean pair of pruning shears, sharp scissors, or even a craft knife will do the job perfectly. What you're after is a clean, crisp slice that doesn't crush the plant tissue. This one simple thing is your best defense against rot and disease right from the start.
The Propagation Station Checklist
With your cutting tool sorted, there are just a few more things you'll want to grab to create a happy home for your future succulents. We’re keeping it simple here.
- Shallow Trays or Small Pots: You need something to put your cuttings in, and drainage is key. I love using shallow seed trays for laying out a bunch of leaves at once. For stem cuttings, small 2-3 inch nursery pots are perfect.
- The Right Soil Mix: This is absolutely non-negotiable. Grab a bag of commercial succulent or cactus mix. It's specifically formulated to be gritty and drain quickly, which is exactly what new cuttings need to avoid rotting. Please, don't use regular potting soil; it's a death sentence.
- A Spray Bottle: You won’t need this right away, but a simple mister is the best way to provide a tiny bit of moisture once you see those first little roots appear, without washing the delicate cuttings away.
A classic beginner mistake is reaching for a pot that’s way too big. A large pot holds a ton of extra soil that stays wet for too long, creating the perfect environment for rot to set in before the roots even have a chance. Always, always start small.
Let's Talk About Rooting Hormone
You'll almost always see rooting hormone pop up in guides like this. It's a powder, usually containing auxins (plant growth hormones), designed to give root development a kickstart. So, do you really need it?
Honestly, for most of the easy-to-propagate succulents like Echeveria, Sedum, or Graptopetalum, it’s completely optional. These guys are practically designed to re-root themselves with minimal fuss.
That said, rooting hormone can be a great little insurance policy, especially for trickier species or woody-stemmed succulents. It can definitely speed things up and might improve your success rate. But don't feel like you have to rush out and buy it. Your success really depends more on getting that clean cut, letting it callous over properly, and using the right soil.
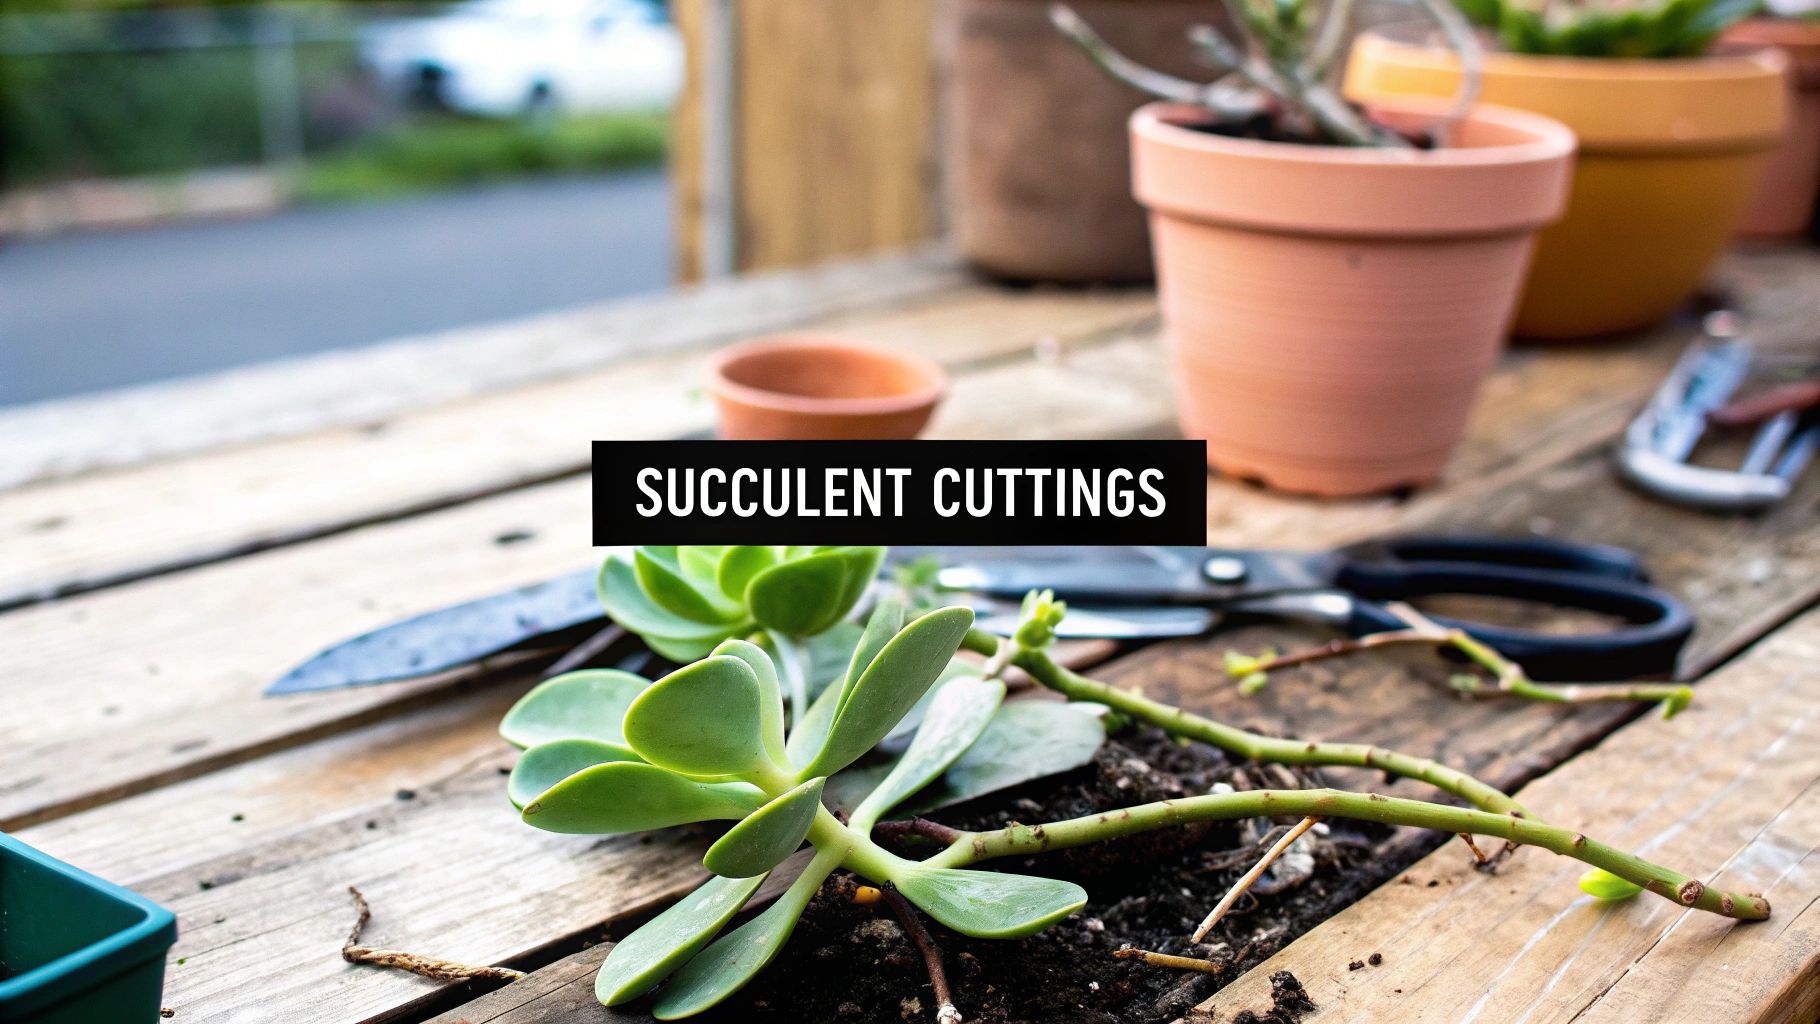
How to Take Cuttings for the Best Results
Getting succulents to grow from cuttings all comes down to one critical moment: the initial cut. A clean, healthy start is everything and will make or break your chances of seeing new roots. The exact method changes a bit depending on the type of succulent, but the goal is always the same—minimize damage to both the parent plant and your new cutting.
Taking Leaf Cuttings
This isn't a time for brute force. When you're working with rosette-forming succulents like an Echeveria or the trailing Sedum morganianum (Burro's Tail), you want to remove a leaf perfectly intact. I've found a gentle twist-and-pull motion works wonders.
Just grab a healthy, plump leaf near the base of the plant and gently wiggle it from side to side. You'll feel a little "pop" as it detaches cleanly from the main stem.
You'll know you nailed it if the base of the leaf looks a little scooped out or concave. That little divot means you got a tiny piece of the stem tissue with the leaf, and that's exactly where the new roots and baby plant will form.
Snagging Stem Cuttings
For succulents that grow more like a branching shrub, like a Crassula (Jade Plant) or the vining Senecio (String of Pearls), taking a piece of the stem is a much better bet. Your aim is to snip off a healthy section of stem that’s at least a few inches long and has a good number of leaves on it.
Grab your sharp, sterile shears or knife and make a clean cut right below a leaf node—that’s the little bump on the stem where a leaf grows. This spot is a powerhouse of cells just waiting for a chance to turn into roots. Once you have your cutting, gently pull off the bottom one or two leaves to create a little bit of bare stem. This is the part that will eventually go into the soil.
The real secret to a high success rate is picking the right plant material to begin with. Always take your cuttings from a "mother" plant that is healthy, mature, and well-hydrated. Steer clear of any leaves or stems that look shriveled, yellowed, or damaged. They just don't have the energy stored up to start a new life.
This handy infographic gives you a quick visual of the basic tools you’ll need to get started.
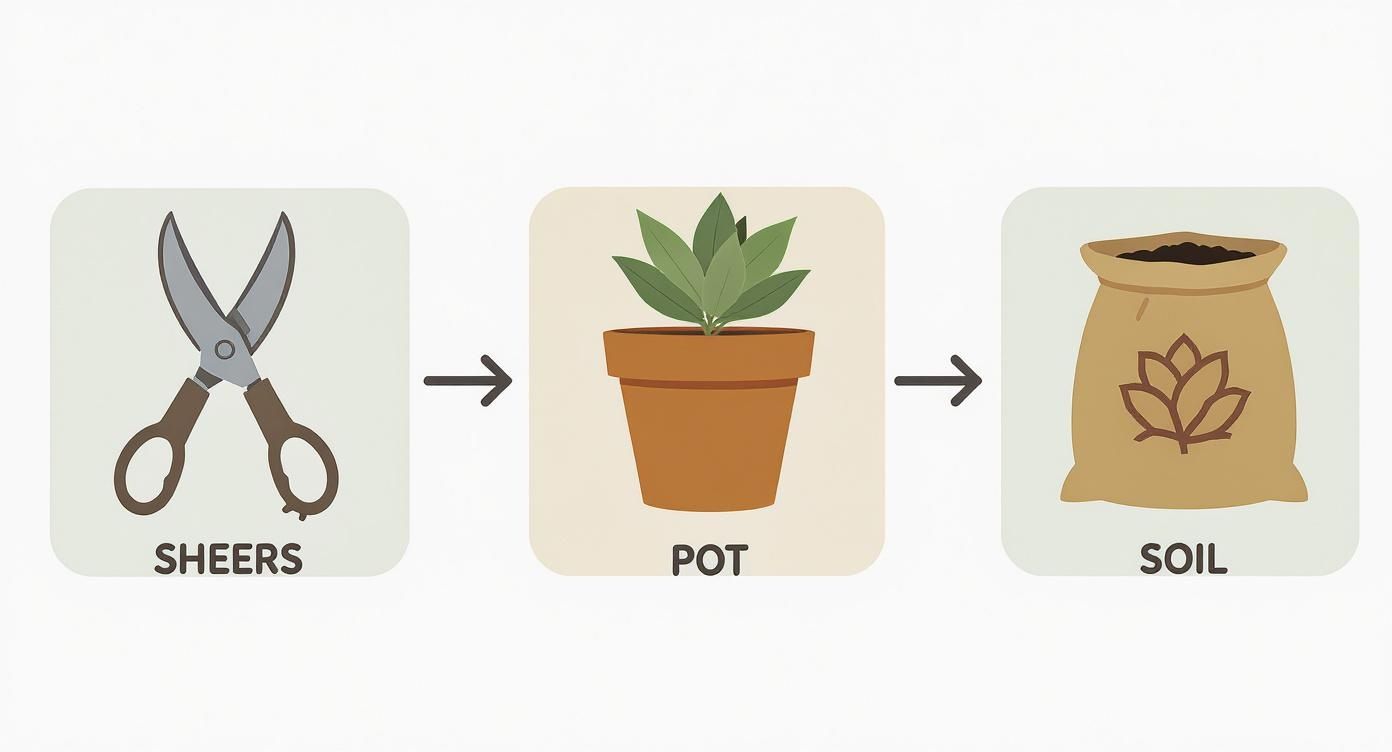
As you can see, it really just comes down to the essentials: a good cutting tool, a pot, and the right kind of soil to encourage those new roots.
A Tried-and-True Method
Growing succulents from cuttings isn’t just some fun trick for hobbyists; it’s how the professionals do it. It might surprise you to learn that 70-80% of all succulents sold in nurseries are grown this way. Why? Because when done right, success rates can soar above 85%. This is all thanks to the incredible, natural ability of succulents to regenerate from even a small piece. You can dive deeper into these succulent propagation findings if you're curious about the science.
And the best part is that this skill translates to other desert plants, too. Many of the same principles apply when you propagate cactus from cuttings. At the end of the day, a clean cut on a healthy plant is the universal first step to multiplying your collection.
The Critical Waiting Game: Callousing and Rooting
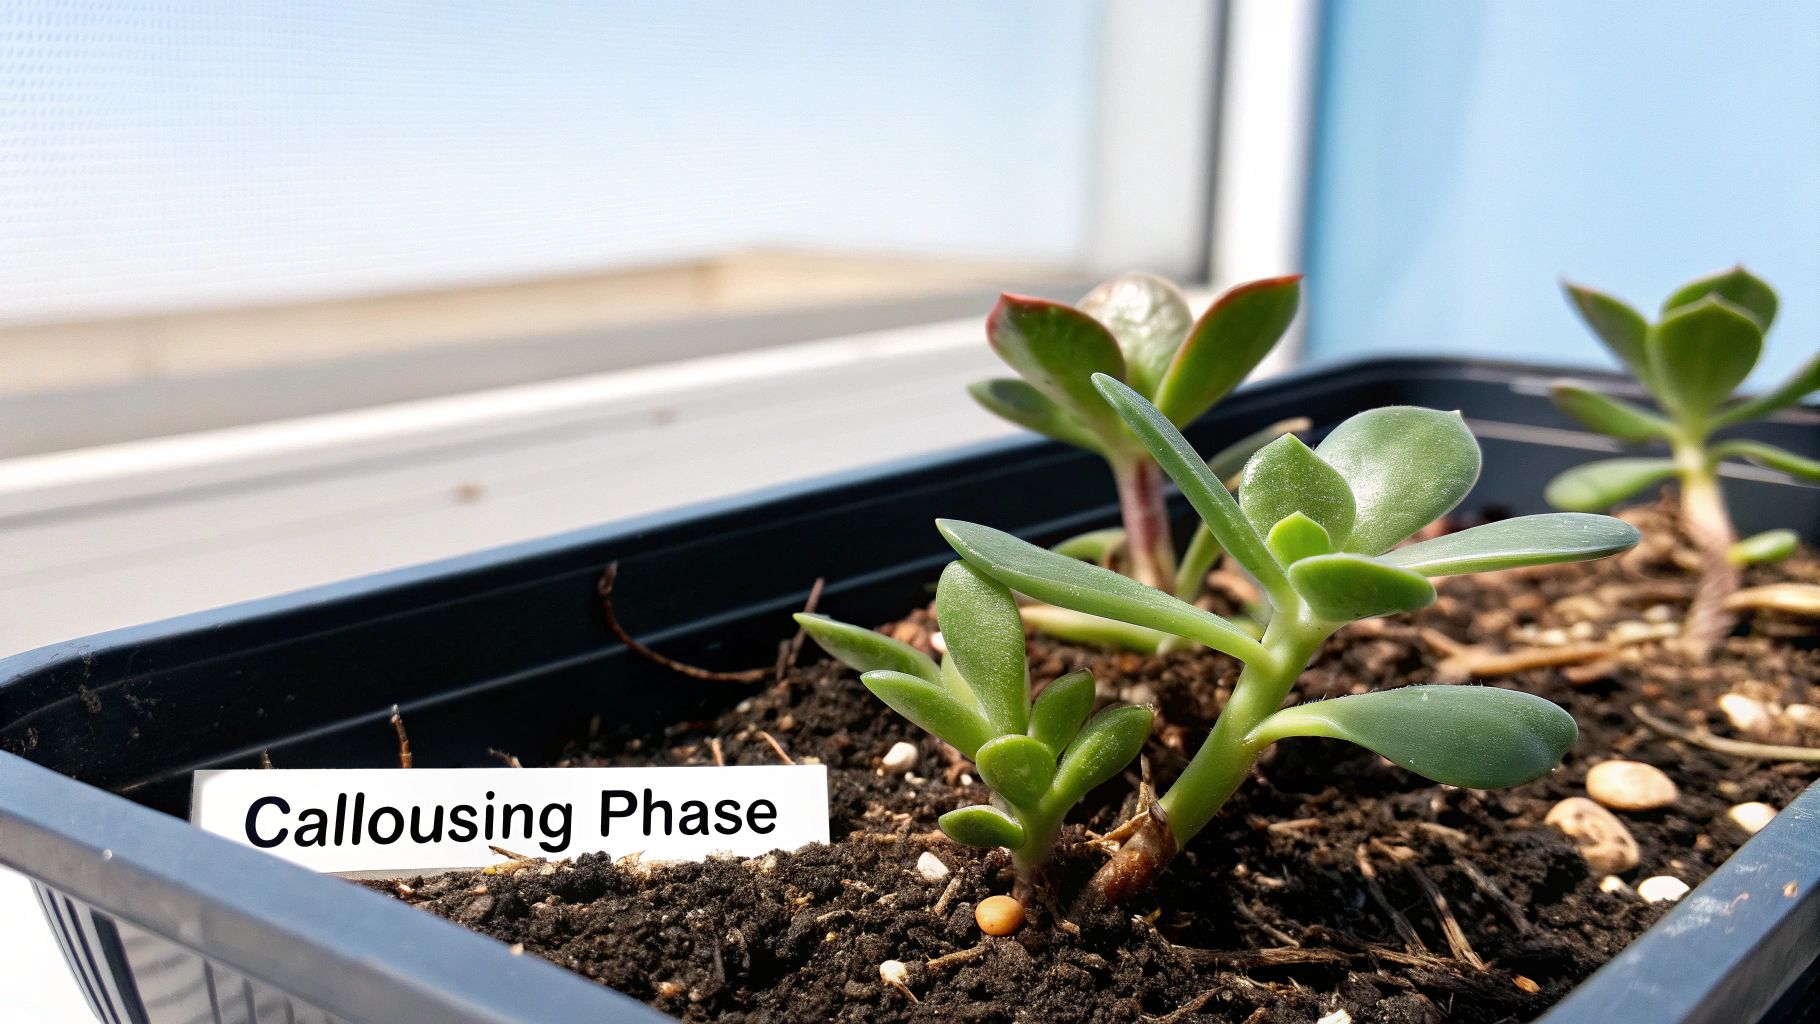
You've made your cuts, and now comes the hardest part for any plant lover: waiting. It feels completely wrong, I know, but you need to leave your fresh cuttings alone to dry out. This is the all-important callousing phase, where the open wound on your cutting seals itself over.
Skipping this step is the number one reason propagations fail. Think of it this way: a fresh, wet cut is an open door for rot, fungus, and all sorts of nasty stuff, especially once it meets soil. By letting the cutting form a dry callus, you're creating a protective barrier that keeps moisture out and prevents your future plant from turning into a pile of mush.
Depending on how thick your cutting is and the humidity in your home, this process can take anywhere from three days to a full week. As you might guess, beefy stem cuttings with their larger wounds usually need a bit more time on the shelf than single leaves.
How To Tell When Your Cuttings Are Ready
So, how do you know the callus has formed? It's pretty straightforward. Gently pick up a cutting and inspect the end you cut. A fully calloused wound will be dry and firm to the touch, almost like a little scab. It won't feel sticky, moist, or fresh anymore.
On a leaf cutting, the tiny point where it popped off the main stem will look sealed over. For a stem cutting, the entire cut surface will appear dry, and it might even look a little shrunken or puckered. Once you see that, you've got the green light to move on to rooting.
Getting Those First Roots to Sprout
With your cuttings properly calloused, it's time to get them situated. The goal here is to give them the right environment and then, once again, resist the urge to helicopter-parent them. Find a spot that gets plenty of bright, indirect light—near a sunny window but out of the direct, scorching rays is perfect.
I've had success with two main approaches at this stage:
- For Leaf Cuttings: The easiest way is to just lay the leaves flat on top of dry succulent soil. Don't bury them. The new roots and baby plant will emerge from the end that was attached to the stem, so you just want that part resting on or very close to the soil.
- For Stem Cuttings: You can either lay these down on the soil just like the leaves, or you can stick the calloused end about half an inch into the potting mix. Just be gentle and don't cram it in there too deeply.
The most common mistake people make here is watering too soon. Don't do it! Until you see actual roots, the cutting has no way to absorb water. Any moisture you add will just sit there, creating a perfect environment for rot. Your cutting has all the water and nutrients it needs stored in its plump leaves to get this party started.
Give it a few weeks. Eventually, you’ll start to see tiny, delicate pink or white roots poking out from the base of the cuttings. This is the magic moment! With leaf propagations, you'll often see a miniature new plant (a plantlet) forming right beside the roots. It's incredibly rewarding.
It’s tempting to check on their progress constantly, but try not to wiggle the cuttings around. You can easily break the fragile new roots. If you must check, give the cutting the slightest little tug. If you feel a bit of resistance, you know roots have formed and are anchoring into the soil. Only then should you even think about giving them their first, tiny sip of water.
Potting and Nurturing Your New Succulents
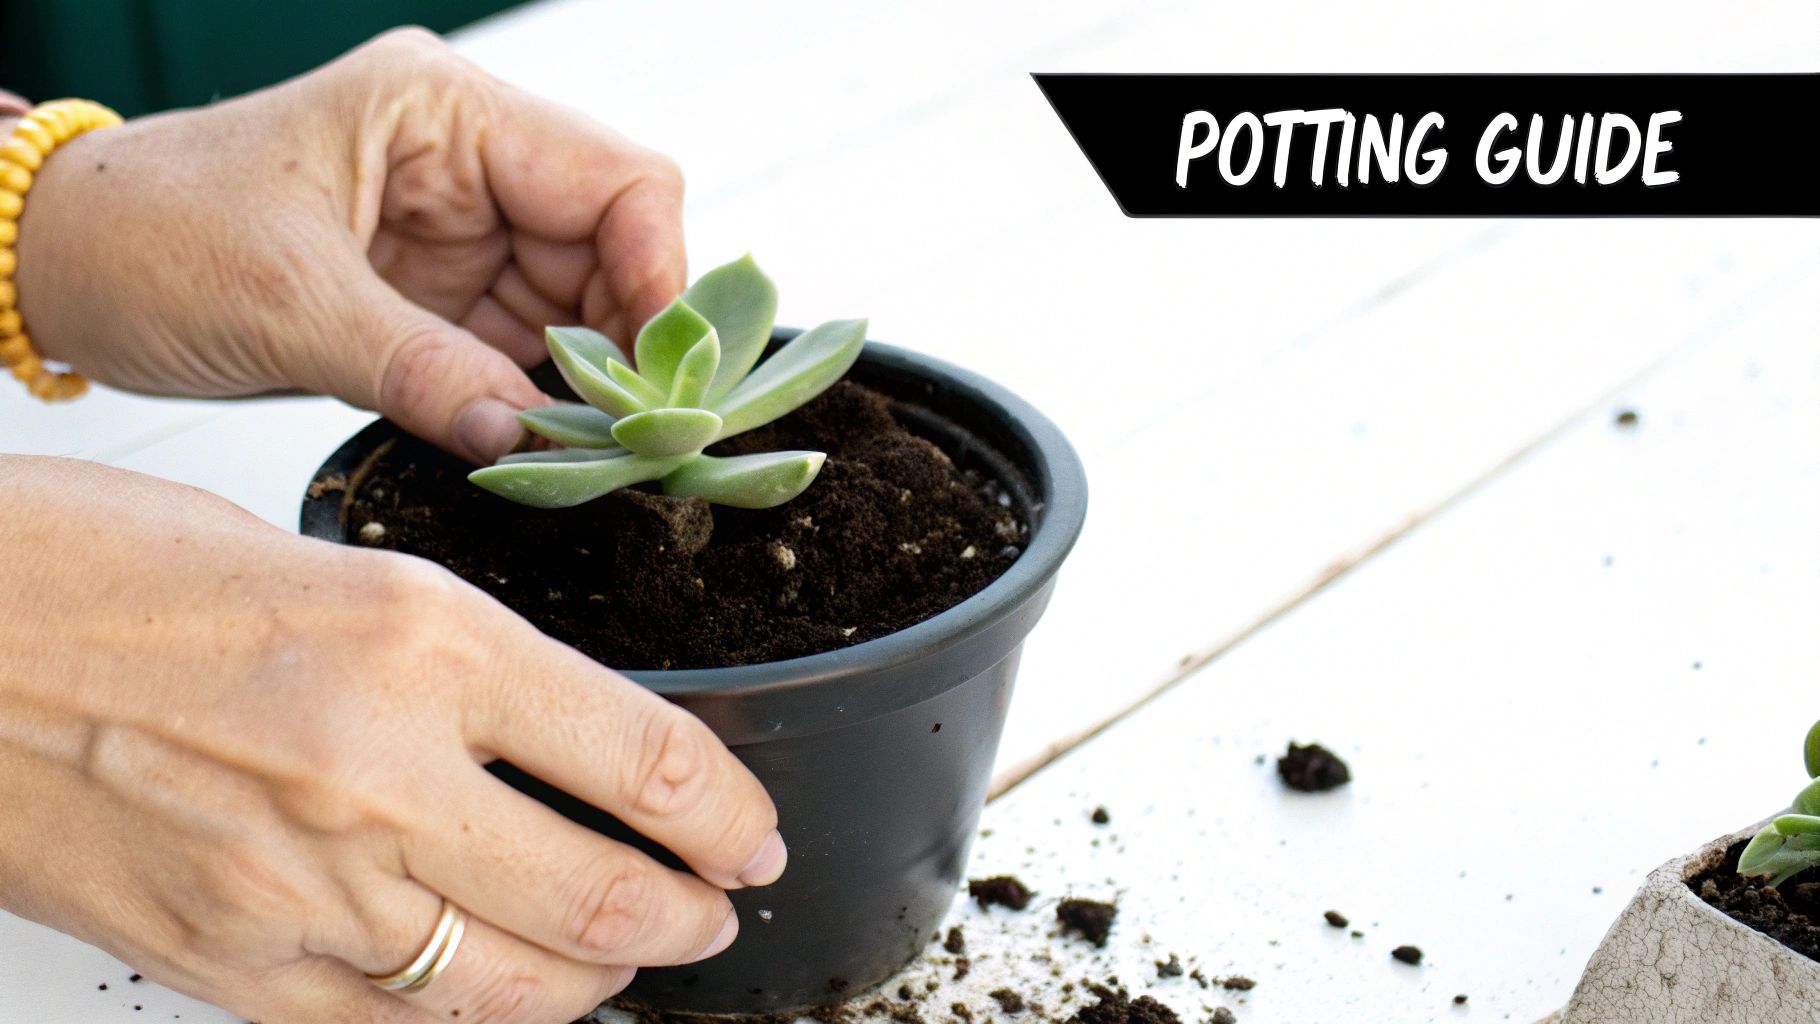
Seeing those first few delicate roots emerge is always a thrill. It's the moment you know your propagation efforts paid off! Now it's time to graduate your little plantlets into their very own pots, giving them the space they need to grow strong.
This next step is critical, and it’s all about providing a stable environment without overwhelming their brand-new, fragile root systems.
Choosing the Right Pot and Soil
Your first instinct might be to give your new succulent a big pot with plenty of room to grow. Don't do it. A small pot, just 2-3 inches across, is your best bet for a fresh cutting.
Why? A larger pot holds way too much soil, which stays wet for too long after watering. This is a recipe for root rot, the fastest way to kill a young succulent. Stick with small terracotta or nursery pots that have excellent drainage.
How to Plant Your Rooted Cuttings
Alright, you've got your small pots and some well-draining succulent mix. Let's get these babies planted. The key here is to be gentle—those new roots are incredibly fine and can snap with the slightest pressure.
- First, fill your pot with soil.
- Use your finger or the end of a pencil to poke a shallow hole in the center, just deep enough for the new roots.
- Carefully lower the cutting into the hole.
- Gently push the surrounding soil against the base of the cutting to hold it in place. You're just trying to nestle it in, not pack the soil down tightly.
If you want a more detailed walkthrough, our complete guide on potting succulent cuttings breaks down every single step.
Your newly potted cuttings are sensitive. Think of them as newborns. Avoid placing them in harsh, direct sunlight right away, as the shock can easily scorch their leaves and stress the developing roots. A spot with bright, indirect light is the perfect nursery for them.
Nailing the Watering Routine
Watering is probably the trickiest part for newcomers. Mature succulents love the "soak and dry" method, but your new cuttings need a different approach to start.
For the first couple of weeks, you want to keep the soil lightly and consistently moist. Don't drench it, but don't let it get bone dry, either. This consistent moisture encourages the roots to grow and spread out into the new soil.
After a few weeks, give the plant a very gentle tug. If you feel a little resistance, that’s a great sign that a healthy root system is forming! Now you can start transitioning to a normal watering schedule: water thoroughly until it drains, then let the soil dry out completely before you water again.
Troubleshooting Common Propagation Problems
Even with the best care, you can run into a few bumps along the road. Don't worry—most issues are easy to fix once you know what to look for.
Here’s a quick table to help you diagnose and solve some common problems you might encounter.
| Problem | Symptom | Solution |
|---|---|---|
| Cuttings are mushy or black | The base of the cutting is soft, discolored, and may have a foul smell. | This is rot. The cutting was likely overwatered or not allowed to callus. Discard the affected cutting and start over, ensuring the new one calluses properly. |
| Leaves are shriveling | The leaves on your cutting look wrinkled and dehydrated. | The cutting may not have enough roots to absorb water yet. Mist the soil lightly every few days instead of deep watering. Patience is key. |
| No roots are forming | After several weeks, there are no signs of root growth. | The cutting might need more light or warmth. Move it to a brighter, warmer location (but still out of direct sun) to encourage growth. |
| Pests appear (e.g., fungus gnats) | You see tiny black flies hovering around the soil. | Fungus gnats are attracted to damp soil. Let the soil dry out more between waterings and ensure good air circulation. |
Remember, every cutting is a little different, so don't be discouraged if a few don't make it. It's all part of the learning process
Common Questions on Propagating Succulents
Even with the best guide in hand, you're bound to run into a few questions when you start propagating succulents. It's just part of the learning process! Let's walk through some of the most common hurdles people face, so you can get your new plants growing strong.
How Long Does It Take for Cuttings to Root?
This is probably the number one question I get, and the honest answer is: it depends. Patience is the name of the game here. The rooting timeline can shift quite a bit based on the type of succulent, whether you're using a leaf or a stem, and the conditions you provide.
As a general rule of thumb, you might start seeing the first tiny, pinkish roots emerge from leaf cuttings in about 2 to 4 weeks. Stem cuttings usually get a head start, sometimes showing new growth in as little as 1 to 2 weeks. But don't get discouraged if it takes longer! From that first root to a fully established, independent little plant can take a few months, especially when starting from just a single leaf.
Why Are My Leaf Cuttings Turning Mushy or Rotting?
Ah, the dreaded mush. If you see your cuttings turning translucent, black, or feeling squishy, you're dealing with rot. This is hands-down the most common mistake for beginners, and it almost always comes down to too much moisture.
Let’s pinpoint the usual suspects:
- You skipped the callousing step. Putting a fresh cutting directly onto soil is like leaving an open wound in a damp environment—it’s a recipe for infection. You absolutely have to let that cut end dry out and form a protective callus for a few days first.
- You watered too early. This is a big one. A cutting has no roots, which means it has no way to drink water from the soil. Any water you add before roots have formed just sits there, creating the perfect soggy conditions for rot to set in.
- There’s not enough air circulation. Stale, humid air can also encourage fungus and rot. Make sure your propagation tray is in a spot with some decent airflow.
Once a cutting has turned to mush, there’s no saving it. The best thing to do is toss it out and start over, keeping these key points in mind for your next attempt.
It’s a bit of a balancing act. While baby plants that are just starting to root need a little more moisture than their established parents, they are still incredibly vulnerable to overwatering. The key is to wait for roots, and even then, let the soil dry out. We cover this in detail in our guide on how to water succulents, which can help you avoid this common problem.
Do I Need to Use Rooting Hormone?
Honestly, for most common succulents, you don't. Things like Echeveria, Sedum, and Graptopetalum are so eager to grow that they'll root just fine on their own without any help. They have all the natural hormones they need.
That said, rooting hormone can be a useful tool to have in your kit. It can definitely speed up the process and might give you a better success rate, especially with trickier varieties or those with thicker, woodier stems.
Think of it as an optional boost, not a required ingredient. Your success really hinges on starting with a healthy cutting, making a clean break, and letting it callus over properly.
Ready to expand your collection with something truly special? At The Cactus Outlet, we offer a stunning variety of healthy, mature succulents and cacti perfect for any home or garden. Browse our collection today!