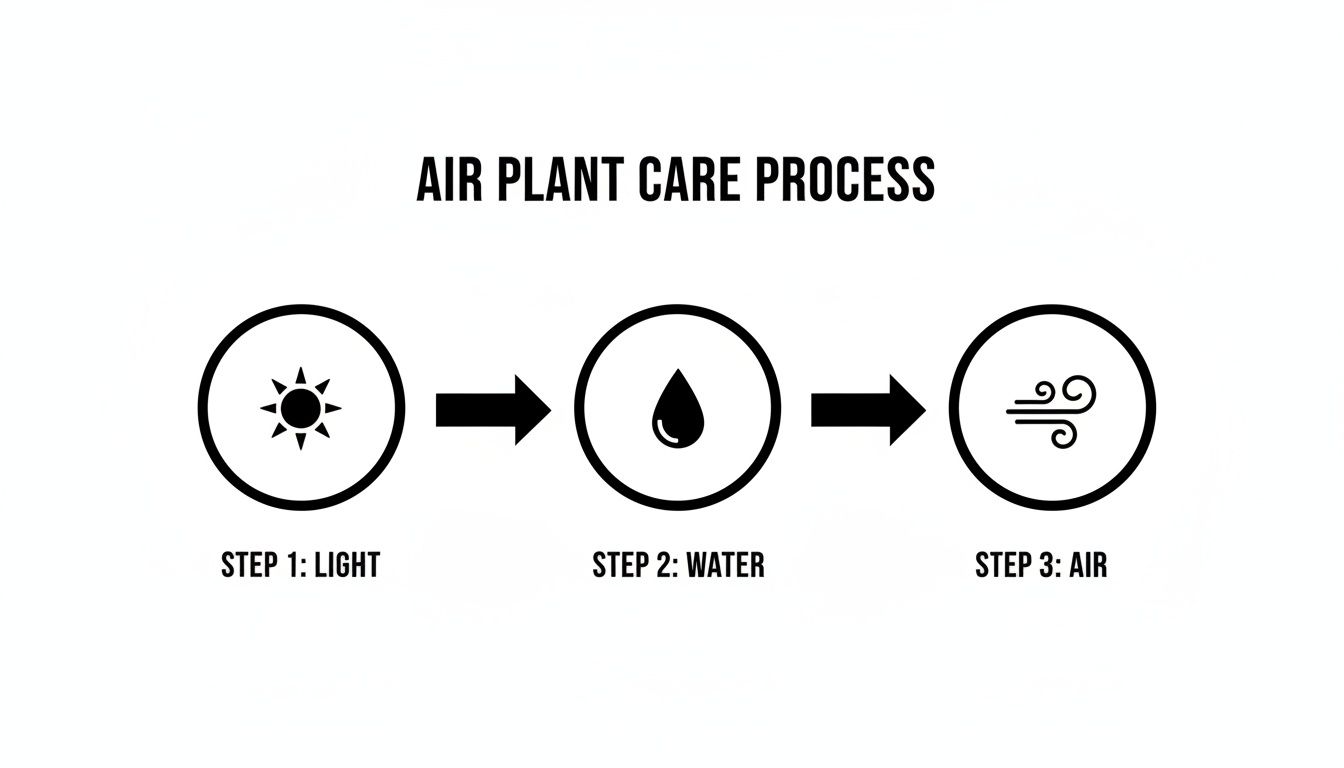
If you're new to Tillandsia, or air plants, there are three things you absolutely must get right: bright but indirect light, a regular watering routine, and plenty of air circulation so they can dry out properly. Nail these, and you're well on your way.
These aren't your typical houseplants. As epiphytes, they don't grow in soil. Instead, they absorb water and nutrients right through their leaves using tiny, specialized scales called trichomes. This is what makes their care so different—and in many ways, so much simpler—than traditional potted plants.
Your Essential Guide to Thriving Tillandsia
Welcome to the wonderfully soil-free world of Tillandsia! These fascinating little plants grow on trees and rocks in their native habitats, clinging on with their roots but taking everything they need from the air. This unique lifestyle makes them incredibly versatile for home decor, allowing you to create a touch of green in just about any space.
Their popularity is no small thing. The indoor plant market is booming, valued at $20.41 billion globally and on track to hit $32.78 billion by 2034. Air plants are a big reason why. For nurseries, they can be 25-40% cheaper to produce since there's no soil, fewer pots, and less trouble with pests, which is a win for both growers and buyers.
The Three Pillars of Air Plant Health
When it comes to keeping your Tillandsia healthy, it really boils down to three key environmental factors. Get these right, and your plants will do more than just survive—they'll flourish.
-
Light Done Right: Your air plant craves bright, filtered light. Think of the dappled sun it would get under a tree canopy. Too much direct sun will fry its leaves, but a dark corner will slowly starve it. An east-facing window that gets gentle morning sun is usually the sweet spot.
-
A Solid Watering Plan: Forget everything you know about watering soil. Your Tillandsia needs a good soak or a thorough rinse. How often depends entirely on your home's humidity levels, but a weekly dip is a great place to start.
-
The Importance of Airflow: This is the one people forget, and it's a killer. After you water your plant, it needs to dry out completely within a few hours. If it stays wet, it will rot from the inside out. This is, without a doubt, the number one reason air plants die.
Key Takeaway: The golden rule of air plant care is to never let your Tillandsia sit in standing water. After every watering, give it a gentle shake to get rid of excess water from its base and place it somewhere with good airflow to dry.
This simple routine makes them fantastic, low-fuss plants for just about anywhere, including the workplace. Their minimal needs make them some of the best indoor plants for offices, where care can sometimes be sporadic.
While Tillandsia are unique in their soil-free needs, understanding different plant requirements is key to becoming a well-rounded plant parent, especially if you're exploring other plant types like drought-resistant garden plants for an outdoor project. For now, let's stick to keeping these indoor beauties looking their best.
To help you get started, it's useful to know that air plants generally fall into two categories: Xeric and Mesic. Xeric types are from drier, sunnier climates and often look silvery or fuzzy, while Mesic types come from more humid, shadier environments and are typically greener and smoother. Their appearance gives you clues about their care needs.
Here's a quick cheat sheet to tell them apart and care for them accordingly.
Air Plant Care at a Glance
| Care Aspect | Xeric (Silver/Fuzzy) Species | Mesic (Green/Smooth) Species |
|---|---|---|
| Light | Prefers more light; can handle some direct sun (but not intense afternoon sun) | Prefers bright, indirect light; more sensitive to direct sun |
| Watering | Less frequent watering; quick dunks or heavy misting. More drought-tolerant. | More frequent watering; prefers weekly soaks (20-60 minutes). |
| Humidity | Tolerates lower humidity well | Appreciates higher humidity |
| Drying | Dries quickly due to trichomes | May take longer to dry; ensure good air circulation to prevent rot |
| Examples | Tillandsia xerographica, T. tectorum, T. ionantha | Tillandsia butzii, T. bulbosa, T. abdita |
Knowing which type you have takes a lot of the guesswork out of the equation and helps you dial in the perfect environment for your specific plant.
Mastering Light, Water, and Air Circulation
Getting the balance of light, water, and air right is the real secret to helping your Tillandsia thrive. Think of it this way: plants in soil have a buffer zone that can forgive a few mistakes. Air plants don't have that luxury—they're completely at the mercy of their environment. Nailing these three elements is what turns a sad, struggling plant into a vibrant, healthy one.
This isn't just a checklist; it's a cycle. The light your plant gets affects how thirsty it becomes, and how you water it makes the final drying step absolutely critical.
Finding the Sweet Spot for Light
You hear "bright, indirect light" all the time, but what does that look like in a real home? It's the kind of light you'd find a few feet away from a window, not sitting right on the windowsill baking in the sun. The goal is to give them enough energy to photosynthesize without scorching their delicate leaves.
An east-facing window is often the jackpot. It provides gentle morning sun that won't overwhelm the plant. If you have a south or west-facing window, just pull the plant back a few feet or hang a sheer curtain to diffuse that intense afternoon glare.
A couple of common lighting mistakes I see all the time:
- Too much direct sun: Placing an air plant in a south-facing window in the middle of the afternoon is like putting it under a magnifying glass. It will dehydrate and burn fast.
- Not enough light: That dim bookshelf in a dark corner might look nice, but it's not a long-term home. Your plant will slowly starve for energy there.
The Art of Watering Your Air Plant
Watering is where most people get tripped up. Since Tillandsia don't live in soil, it's up to you to deliver moisture directly to their leaves. There are a couple of solid methods, and which one you choose often comes down to personal preference and how much time you have.
The core of it is a weekly soak for 20-30 minutes in good-quality water, like rainwater. They also need 4-6 hours of bright, indirect light daily and are happiest in temperatures between 50-90°F. Their unique fuzzy scales, called trichomes, are what allow them to absorb water and nutrients right from the air. You can learn more about these fascinating adaptations in botanical studies on epiphytes.
1. The Full Soak
This is my go-to method for a deep, thorough watering. Just submerge your plants in a bowl of room-temperature water for about 20-30 minutes once a week. If a plant looks particularly sad or wrinkly, a longer "spa day" soak for an hour can work wonders.
2. The Quick Dunk
If you've got a large collection or are short on time, this is a great alternative. Simply hold each plant under a running faucet until it's completely saturated. It's less immersive, so you may need to do this twice a week, especially if your home is on the dry side.
Pro Tip: Whatever you do, never use distilled water. It's been stripped of all the minerals your air plants need. Stick to filtered tap water, rainwater, or even used aquarium water—they all contain trace nutrients that your plants will appreciate.
The Critical Final Step: Airflow and Drying
Listen up, because this is the single most important part of keeping your air plant alive. After every single watering, your Tillandsia must dry completely within three to four hours. If water gets trapped in the base of its leaves, it will rot. And once rot sets in, it's almost always game over.
After a soak or rinse, give the plant a gentle shake while holding it upside down to get rid of any pooled water. Then, lay it on its side or upside down on a towel in a spot with plenty of air movement. Cracking a window or aiming a small fan nearby on a low setting works perfectly.
Think of it like this:
- Good Airflow: Replicates the breezy, treetop homes they come from.
- Stagnant Air: Creates a damp, humid pocket where fungus and rot can take hold.
This is especially crucial if you're displaying your plants in terrariums or glass globes. Make sure any container has large openings for air to circulate freely. A completely enclosed globe is a death sentence for an air plant; it traps moisture and suffocates the plant.
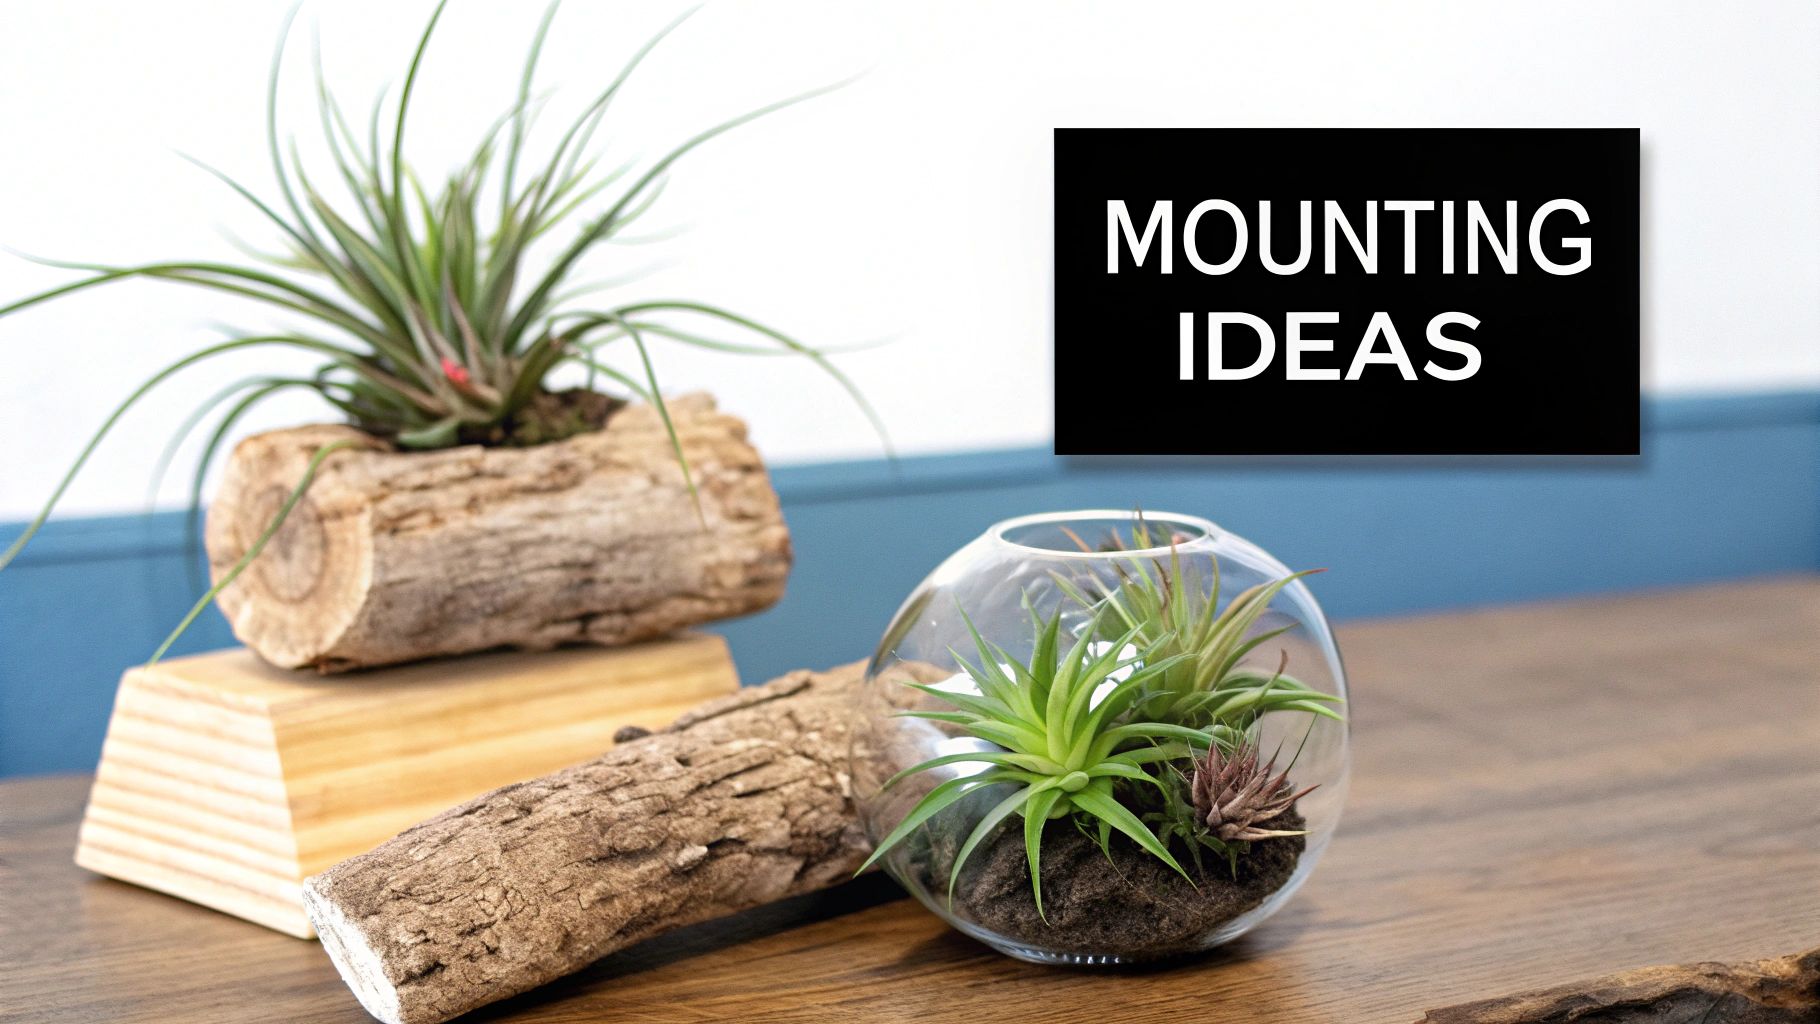
Creative Ways to Display and Mount Air Plants
One of the best parts about growing Tillandsia is how incredibly versatile they are. Forget traditional pots—since they don't need soil, you can get creative and place them almost anywhere that has good light. This is your chance to transform a simple houseplant into a living piece of art.
The trick is finding that sweet spot between a display that looks great and one that keeps your plant healthy. You need to prioritize light and, most importantly, air circulation. A stunning display that ends up suffocating your plant won't be stunning for very long. The goal is to create a secure, beautiful home where you can easily pop the plant out for its weekly watering.
Choosing Your Mounting Surface
The foundation of a great display is the mount itself. I’ve found that natural, porous materials are always the best bet. They look fantastic and mimic the tree bark and rocks Tillandsia cling to in their native habitats.
Driftwood, cork bark, and cholla wood skeletons are all excellent choices. When you're picking a piece, look for interesting textures and shapes that complement the specific air plant you have in mind. Just be sure to avoid any pressure-treated wood, as those chemicals can be toxic to your Tillandsia. For some really unique ideas, you can even look into upcycling furniture for creative plant displays and craft your own custom stands or wall hangers.
Secure Mounting Techniques
Once you've found the perfect mount, it's time to attach your plant. You want it to be firm, but you have to be careful not to damage it. Here are a few reliable, plant-safe methods I use all the time:
- Plant-Safe Adhesive: A waterproof, non-toxic glue is the go-to for a permanent display. E-6000 works great. Just put a small dab on the very base of the plant (never the leaves!) and gently press it onto your mount.
- Flexible Wire: If you want a non-permanent option, a thin, flexible wire is perfect. It lets you gently cradle the plant and wrap it onto the mount. This makes it much easier to remove the plant for a good soaking. Just stay away from copper wire, as it’s toxic to bromeliads.
- Fishing Line: For an almost invisible look, clear fishing line is a fantastic choice. It secures the plant while giving it a natural, "floating" appearance.
Important Reminder: I can't stress this enough: only apply glue to the hard, root-like base of the Tillandsia. Never put it on the green leaves. The leaves are how the plant absorbs all its water and nutrients, and covering them up will slowly kill it.
Terrariums and Glass Globes
Glass terrariums and hanging globes are super popular for a reason—they look amazing. But they come with a huge red flag. Honestly, the biggest mistake I see beginners make when learning how to grow Tillandsia air plants is putting them in a closed container.
A sealed terrarium is a death trap. It holds in moisture and cuts off the air circulation your plant absolutely needs to dry out after watering. This is a fast track to irreversible rot. Always, always choose globes with large openings or open-sided geometric terrariums that allow for plenty of airflow. Many of the same open-air principles in our guide on succulent terrarium ideas apply here, too.
After you water your plant, make sure it is 100% dry before you even think about putting it back inside a glass container. This one simple step is the difference between a thriving display and a tragic, mushy mess. A little patience after bath time goes a very long way.
How to Fertilize and Propagate Tillandsia
While your Tillandsia is perfectly capable of pulling trace nutrients from the air and water, a little supplemental feeding is like giving it a supercharged health boost. Honestly, you don't have to fertilize them. But if you want to see more vibrant growth, stronger plants, and—the real prize—those incredible blooms, it's a step worth taking.
Think of it as a multivitamin. Your plant will survive without it, but it's going to be so much more robust with a consistent nutrient supply. This simple addition to your routine can make a huge difference.
Feeding Your Air Plants Correctly
When it comes to fertilizing Tillandsia, the golden rule is simple: less is more. These plants are incredibly sensitive to over-fertilization, which can easily burn their delicate leaves. The best bet is a fertilizer made for bromeliads or even a good orchid food, but you absolutely must dilute it.
My go-to recommendation is a quarter-strength dilution. If the bottle tells you to mix one teaspoon per gallon for other plants, you'll only use a quarter-teaspoon for your air plants. It’s always safer to under-feed than to risk burning your plant.
A great schedule to follow is feeding once a month during spring and summer when the plants are actively growing. Just add the diluted fertilizer to the water you use for their weekly soak. When fall and winter roll around, you can ease off, cutting back to once every other month or stopping completely to let them rest.
Crucial Tip: Never, ever fertilize a dry plant. Make sure your Tillandsia is well-hydrated before you give it a fertilizer soak. A thirsty plant can absorb the nutrients too quickly and burn, while a happy one will take in the food much more effectively.
Propagating Air Plants Through Pups
One of the most rewarding parts of growing air plants is watching them multiply. After a Tillandsia finally blooms, its life cycle starts to shift. The original "mother" plant will put all its energy into creating offsets, which we affectionately call pups. These are just tiny new plants that pop up at the base of the mother.
Finding that first pup is always a thrill. It's a clear sign your plant is healthy and happy enough to reproduce, giving you more plants for free! Propagating at home is also a great way to support a more sustainable hobby, as a surprising 95% of Tillandsia are still collected from the wild. If you're curious, you can read more about the global trade and cultivation of these plants to see why home propagation matters.
This process is quite similar to how many other plants in this family reproduce. If you also grow succulents, our guide on how to propagate succulents covers some familiar techniques that might feel helpful.
When and How to Separate Pups
Patience is key here. A pup that’s removed too early will really struggle to make it on its own. The rule of thumb I always follow is to wait until the pup is at least one-third to one-half the size of the mother plant. By that point, it’s developed enough to be self-sufficient.
When you're ready to separate a pup, it's usually pretty straightforward:
- Hold the mother plant and the pup firmly at their bases.
- Gently twist the pup downward with a little pressure. Most of the time, it will pop right off.
- If it puts up a fight, don't force it. You can use a clean, sharp knife or a pair of shears to carefully cut it away as close to the mother as you can.
That's it! You now have a brand-new, independent plant. Just care for it like you would any of your other air plants.
Of course, you don't have to separate them. Leaving the pups attached will create a stunning, multi-plant clump over time. With a few years, this can grow into an impressive sphere of interconnected plants, which makes for a beautiful, natural display. The mother plant will gradually wither away after producing her pups, but her offspring will carry on, eventually creating pups of their own.
Troubleshooting Common Air Plant Problems
Even with the best intentions, things can go sideways with your Tillandsia. Don't panic. Most common issues are easy to diagnose and even easier to fix once you know what you’re looking for. Think of this as your field guide to understanding what your plant is trying to tell you.
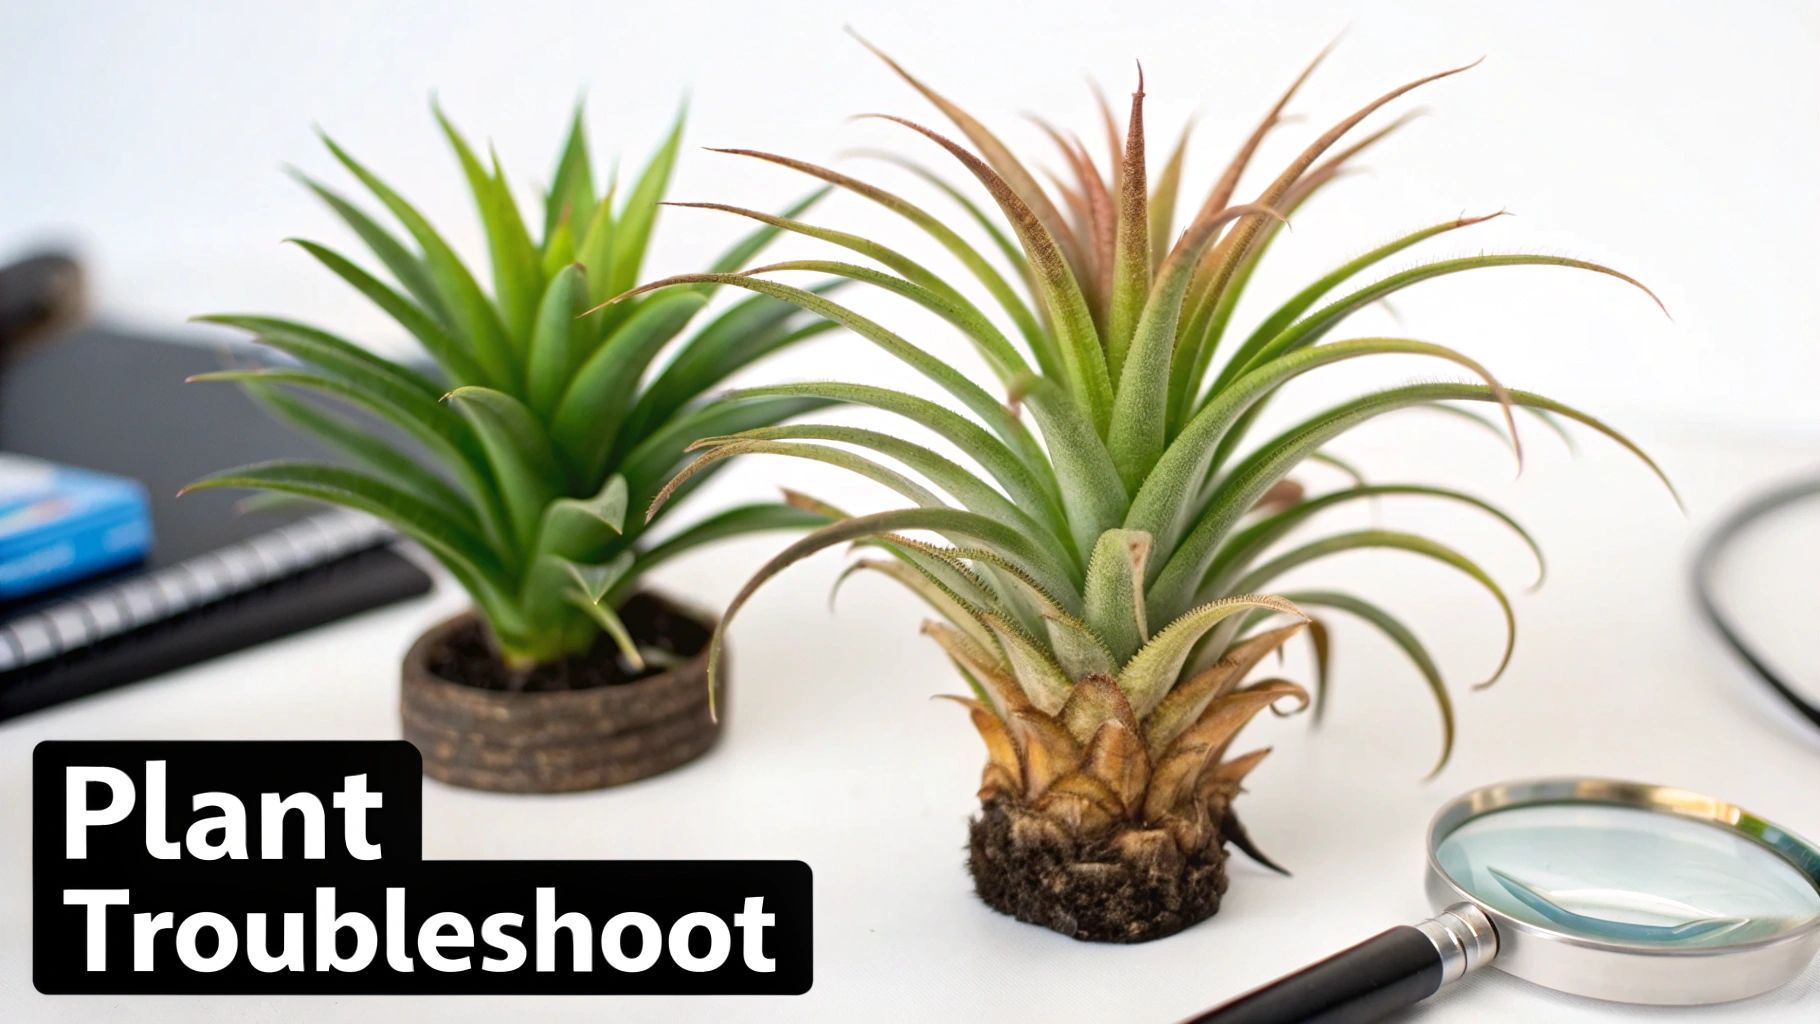
Catching a problem early is the secret to a quick recovery. We’ll walk through the most frequent visual cues—from crispy leaves to a mushy base—and give you clear, practical steps to get your plant back on track.
Diagnosing Underwatering and Overwatering
Nine times out of ten, a struggling air plant is having water issues. It's either getting too much or too little. While the symptoms can sometimes look similar, a closer inspection will point you to the real cause. Learning to tell them apart is probably the most important skill you'll develop as an air plant owner.
An underwatered plant just plain looks thirsty. Its leaves will curl inward more than usual, and the tips might feel dry and crispy. The whole plant can look a bit dull, losing that vibrant, healthy color.
On the other hand, overwatering leads to rot, the number one killer of air plants. A rotting plant will feel soft and mushy right at the base. You might see the lower leaves turn brown or black and fall off with the slightest touch. Once rot sets in, it’s often irreversible, so prevention is everything.
The Golden Rule of Air Plant Health: After every watering, your plant must dry completely within three to four hours. This single step prevents the dreaded rot that comes from water pooling at the base of the leaves.
If you have a thirsty plant, treat it to a long soak for a few hours. After its spa day, make sure it dries out completely and then adjust your watering schedule to be a bit more frequent. If you suspect rot, you have to act fast. Gently pull away any mushy leaves. If the core is still firm and green, there’s a chance you can save it by letting it dry out thoroughly and giving it much better air circulation.
Solving Light-Related Issues
Getting the light right is a balancing act. Too little light, and your plant’s color will start to fade. That vibrant green will turn into a pale, washed-out version of its former self. It might also get "leggy" as it stretches desperately toward a light source.
Too much direct sun is just as bad—it’s essentially a sunburn. You’ll notice white or brown patches on the leaves where the tissue has been scorched. This happens all the time with Mesic (greener) species that get placed in a hot, south-facing window.
Here’s how you can make a quick fix:
- For Pale, Fading Plants: Gradually move your Tillandsia to a brighter spot. An east-facing window with gentle morning sun is perfect.
- For Sunburned Plants: Get it out of the direct sun immediately. The burned spots won't heal, but the plant can recover and put out new, healthy growth from a safer location.
Dealing with Pests and Other Concerns
Pests are pretty rare on indoor air plants, but they can pop up. Mealybugs and scale are the most likely intruders. They’ll look like tiny, white cottony spots (mealybugs) or hard brown bumps (scale). If you spot them, just dip a cotton swab in rubbing alcohol and wipe the pests off.
Sometimes, a plant just seems… stalled. No new growth, no changes. This might be a sign it’s hungry for nutrients. While not strictly necessary, feeding your plant with a diluted bromeliad fertilizer once a month during the growing season can kickstart vigorous new growth and even encourage it to bloom.
To help you figure out what’s wrong at a glance, we've put together this simple diagnostic table. It covers the most common symptoms and gives you a straightforward solution to get your plant healthy again.
Air Plant Problem Solver
| Symptom | Likely Cause | Solution |
|---|---|---|
| Crispy, brown leaf tips | Underwatering or low humidity | Soak the plant for 1-2 hours, then resume a more frequent watering schedule. Mist between waterings if your home is very dry. |
| Mushy, dark base; leaves falling off | Overwatering leading to rot | Remove dead leaves. If the core is still healthy, allow the plant to dry completely for several days and increase air circulation. |
| Pale, washed-out color | Insufficient light | Move the plant to a location with brighter, indirect sunlight. |
| White or brown patches on leaves | Sunburn from too much direct light | Relocate to a spot with filtered light. The burned spots are permanent, but new leaves will be fine. |
| Leaves curling inward excessively | Dehydration | A clear sign of thirst. Give the plant a long soak and check your watering frequency. |
Think of this table as your first-aid cheat sheet. By paying attention to these signals, you'll be able to step in and fix things long before they become serious problems.
Your Top Tillandsia Questions Answered
Once you get the hang of the basics, you start running into those trickier, "what if" scenarios. Don't worry, it happens to all of us! This is where you really start to fine-tune your care routine. Let's tackle some of the most common questions that pop up for air plant enthusiasts, from water worries to blooming mysteries.
I’ll help you figure out what’s going on with your plants, so you can solve problems with confidence and keep them thriving.
Can I Really Use Tap Water for My Air Plants?
This is probably the number one question I hear, and the short answer is: most likely, yes. But there’s a catch. If you’re using municipal tap water, you absolutely must let it sit out in an open container overnight. This simple step allows the chlorine, which is no friend to your Tillandsia, to evaporate.
The big exception? Never use water from a water softener. Those systems work by adding salts to the water, and those salts will clog the special scales (trichomes) on your plant's leaves. This blocks them from absorbing water and nutrients, which will, unfortunately, lead to a slow and certain death for your plant.
If you're weighing your options, here’s my personal ranking of water sources:
- Rainwater: This is the absolute best. It's what they get in nature—naturally soft, slightly acidic, and packed with beneficial minerals.
- Pond or Aquarium Water: A close second. It's loaded with natural nutrients from fish waste, giving your plants a gentle, consistent dose of fertilizer.
- Filtered or Bottled Water: A perfectly safe and reliable choice if good tap water or rainwater isn't an option.
- Dechlorinated Tap Water: Totally fine for most people, as long as it's not softened and you’ve let the chlorine off-gas.
A Word of Caution: Whatever you do, never use distilled water. It's too pure. The distillation process strips out all minerals. Through osmosis, this "empty" water will literally pull nutrients out of your plant's leaves, effectively starving it over time.
Why Won’t My Air Plant Bloom?
Seeing that incredible, often colorful bloom emerge is the ultimate reward for good care. If your plant is healthy but refusing to flower, it usually comes down to one of a few things.
First off, be patient. Maturity is key. Most air plants only bloom once in their life, and it can take them a few years to get to that point. If your plant is still young, it just needs more time to grow up.
Light is also a massive trigger for blooming. A plant might be getting just enough light to survive, but not enough to store up the energy needed to produce a flower. If you have a mature plant that hasn't bloomed, try moving it to a spot with a bit more bright, indirect sunlight. That extra energy boost can be all it takes.
Finally, think about its diet. A little fertilizer can go a long way. During the spring and summer growing season, feeding your plant about once a month with a highly diluted bromeliad or air plant-specific fertilizer provides the extra nutrients it needs to kickstart the blooming process.
Is My Air Plant Dead or Just Really Thirsty?
It’s a tough call sometimes. A crispy, sad-looking air plant can look like a goner, but it might just be severely dehydrated. Before you toss it in the compost, there's an easy way to check.
Gently tug on one of the leaves in the very center of the plant. If it pops right out, or if the base of the plant feels soft, mushy, and looks dark, I'm sorry to say it has rotted from the inside out. There's no coming back from that.
But if the leaves are just dry and the base is still firm and solid, you have a fighting chance! Your plant is desperately thirsty, and it's time for an emergency spa treatment.
Here’s how to attempt a revival:
- Give it a deep soak. Place the entire plant in a bowl of room-temperature water (rainwater is best, if you have it!) and let it soak for a few hours. For a really desiccated plant, you can even leave it overnight.
- Dry it out completely. This step is critical. After the long drink, shake out any trapped water and place the plant upside down on a towel in a spot with great air circulation to dry.
- Check for improvement. Within a day or so, you should see a real difference. The leaves should feel softer and more flexible, and the whole plant should look a little greener and plumper.
A healthy plant feels firm. A dead one is either brittle and brown all the way through or falling apart at the base. It never hurts to try one last soak before you give up hope.
At The Cactus Outlet, we're passionate about helping you grow beautiful and healthy plants. Explore our curated collection of cacti and succulents to find the perfect companion for your thriving Tillandsia. https://www.cactusoutlet.com