Caring for a Christmas cactus is far easier than you might think. The real secret is to remember where it comes from—it’s not a desert dweller. This plant is native to the rainforests of Brazil, where it grows on trees, enjoying dappled light and consistent humidity. Once you stop treating it like a typical cactus, you're halfway to seeing those gorgeous holiday blooms.
Your Essential Christmas Cactus Care Guide
Welcome! This guide is all about helping your Christmas cactus truly flourish. The biggest hurdle I see people face is treating their Schlumbergera like a desert succulent. These are epiphytic plants, meaning they naturally grow on other plants (like tree branches) in a humid, shady environment. That's a completely different world from a sun-baked, sandy desert.
Understanding this one key difference changes everything. It informs how you water, where you place it, and what soil you use. Nailing these fundamentals from the get-go is what leads to those spectacular, reliable blooms that make this plant a holiday staple.
Core Pillars of Christmas Cactus Care
Let's start with the basics. If you get these four areas right, you'll have a healthy, happy plant. We'll get into more detail later, but this is the foundation for success.
- Light: Find a spot with bright, indirect sunlight. An east-facing window that gets soft morning sun is perfect. If you only have south or west-facing windows, just pull the plant back a few feet so it's not getting blasted by intense, direct sun. Too much direct light will scorch the leaves, often turning them a reddish-purple color.
- Water: The goal is soil that's consistently moist but never soggy. My go-to method is to wait until the top inch of soil feels dry, then water the plant thoroughly until it drains out the bottom. This approach gives the roots the moisture they need without risking root rot.
- Temperature: To encourage flowers, these plants need cooler temperatures. They are happiest when nighttime temps are between 55-65°F (13-18°C). It's crucial to keep them away from drafts, heating vents, and fireplaces, as sudden temperature swings are a common reason for buds to drop right before they open.
- Soil: Good drainage is non-negotiable. Use a light, well-draining potting mix. You can find blends specifically for succulents, or you can make your own by mixing regular potting soil with some perlite or orchid bark to improve aeration.
It's no surprise these plants are so popular. The global market for cactus plants, including favorites like the Christmas cactus, has seen incredible growth. It grew from $3,860.3 million in 2021 and is projected to hit $7,014.2 million by 2025. For us at The Cactus Outlet, this just shows how many people are discovering the joy of these plants and why good care advice matters so much.
While mastering the needs of your Christmas cactus, don't forget the fundamentals of plant care in general. You can find some valuable gardening insights here that apply to your entire collection.
Getting Light, Water, and Soil Just Right
The secret to a Christmas cactus that doesn't just survive but becomes a stunning holiday showpiece lies in mastering three things: light, water, and soil. These aren't your typical desert dwellers; they hail from the rainforests of Brazil, and getting their environment right is everything. Let's move beyond the generic advice and talk about what your specific plant needs to thrive.
You've probably heard the phrase "bright, indirect light," but what does that actually mean in your home? Think about the soft, dappled sunlight filtering through a rainforest canopy. That’s what we're trying to mimic.
In a practical sense, this looks like:
- A spot a few feet away from a south or west-facing window, just out of reach of the intense afternoon sun.
- Right in an east-facing window, where it can soak up the gentle morning light.
- Tucked behind a sheer curtain, which is perfect for filtering out harsh rays.
Your plant will tell you if the light is wrong. Are the leaf segments turning reddish or purplish? That's a classic sign of sunburn. On the flip side, if the growth looks lanky and stretched out, it's begging for more light. For a deeper look at this, our guide on how much sunlight a Christmas cactus needs has even more placement tips.
The Art of Watering
If there's one mistake people make, it's overwatering. In their natural habitat, these plants grow on trees, so their roots demand excellent drainage and will quickly rot in soggy soil. The "soak and dry" method is your best friend here.
Wait until the top inch of the soil is completely dry to the touch. Don't just guess—stick your finger in there and feel it. When it's finally time to water, give it a good, thorough drink until water runs out of the pot's drainage holes.
Once it's done draining, be sure to empty the saucer. Letting your cactus sit in a puddle is the fastest way to invite root rot, which often shows up as limp, wilting segments even when the soil is wet.
Creating the Perfect Potting Mix
Because Christmas cacti are epiphytes (plants that grow on other plants), standard potting soil is a no-go. It's far too dense, holding on to water and suffocating the roots. A light, airy, fast-draining mix isn't just a suggestion; it's essential for a healthy plant.
You can buy pre-made cactus mixes, but honestly, making your own is incredibly easy and far more effective. A simple DIY recipe gives your plant exactly the drainage and aeration it craves.
Simple DIY Christmas Cactus Soil Recipe
| Ingredient | Ratio | Purpose |
|---|---|---|
| Potting Soil | 1 Part | Provides a base of essential nutrients. |
| Perlite | 1 Part | Creates air pockets for happy roots and excellent drainage. |
| Orchid Bark | 1 Part | Mimics its natural home on tree bark and prevents compaction. |
This blend creates a chunky, light medium that holds just enough moisture while letting the excess drain away freely, which is exactly what happens in its native environment.
Did you know that around 99% of the Christmas cacti imported into the U.S. come from the Netherlands and Denmark? These are the prime sources for the beautiful, healthy plants we offer at The Cactus Outlet. This fact really underscores why understanding their care is so crucial once they make the long journey to your home.
While this guide is tailored for your Christmas cactus, the basic principles of soil science can help all your plants. For a broader look at soil health, this resource on preparing soil for a thriving garden is a fantastic read. Building that foundational knowledge will make you a better plant parent all around.
Encouraging Blooms Through Seasonal Cycles
Getting a Christmas cactus to explode with those vibrant, colorful blooms is what it's all about. It’s the ultimate sign that you’ve really dialed in its care. The secret isn't some magic trick; it's about understanding and working with the plant's natural rhythm throughout the year.
Think of its life in four distinct phases: spring growth, summer maturing, fall bud formation, and finally, winter blooming. Each season cues a different need, guiding your cactus from a period of leafy growth to a stunning floral show. Nailing this cycle, especially the transition into fall, is what makes all the difference.
The Spring and Summer Growth Period
Once the last flower has faded in late winter or early spring, your Christmas cactus shifts gears and enters its active growth phase. This is when you'll see it push out those new, flat leaf segments, which are actually called cladodes. From about April through August, your care routine should be all about supporting this fresh growth.
Keep the soil consistently moist—a good rule of thumb is to water whenever the top inch of soil feels dry. This is also the prime time for feeding. A balanced, water-soluble fertilizer, diluted to half-strength and applied every two to four weeks, gives it the fuel it needs to build up energy reserves for the blooming season ahead. You're essentially helping an athlete train for the main event.
Initiating Buds in the Fall
As the days get shorter and cooler, it's time to change your approach. This is the most important part of the entire process. To get your Christmas cactus to form flower buds, you have to mimic the environmental cues of its native habitat.
Starting in late September or early October, you need to provide two very specific conditions for about six to eight weeks:
- Long Nights: The plant needs 12 to 14 hours of total, uninterrupted darkness every single night. I can't stress this enough—even a quick flip of a light switch can reset the clock and stop buds from forming.
- Cool Temps: Nighttime temperatures need to drop consistently to around 50-55°F (10-13°C). This chill signals that it's time to stop making leaves and start making flowers.
Many people have success moving their plant into a spare room, a cool basement, or even a closet each evening. Another easy trick is to simply cover it with a cardboard box or a dark cloth from dusk until dawn. During this "short-day" treatment, cut out fertilizer completely and scale back on watering, letting the soil get a bit drier than usual.
This timeline helps visualize how the care shifts throughout the year, with each season playing a critical role in the plant's health and blooming cycle.
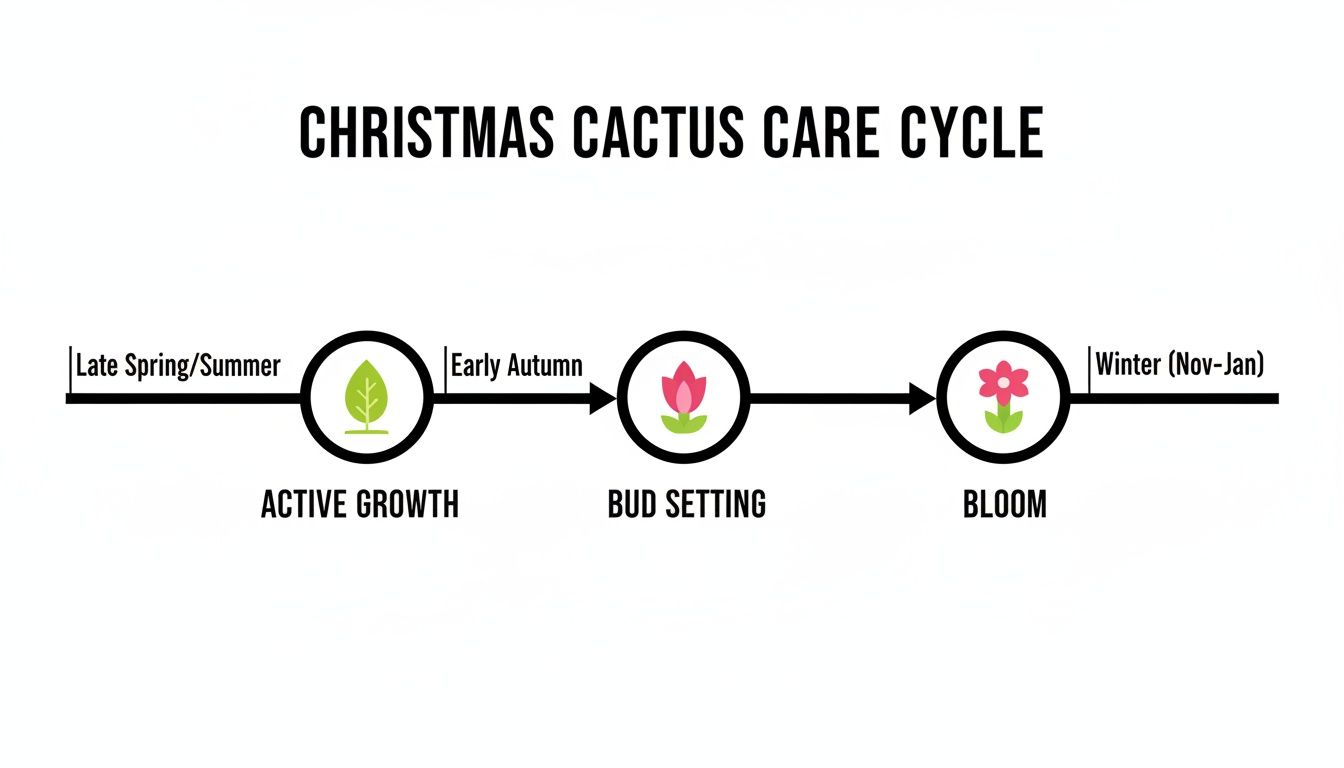
As the flowchart shows, the bud-setting phase in autumn is the most hands-on part of the year, but it's what leads to that incredible holiday display.
Managing the Blooming Period and Preventing Bud Drop
After about six weeks of this cool, dark regimen, you should start seeing tiny pink or reddish buds appear at the tips of the segments. Success! Now you can move the plant back to its normal spot. But be careful—this is when the dreaded "bud drop" often happens.
A sudden, dramatic change in environment is the number one reason a Christmas cactus will drop its buds. Big swings in temperature, light, or watering can stress the plant out, causing it to ditch its precious buds before they even open.
To avoid this frustration, make the transition smooth. Gently move the plant back to its home in a bright, indirectly lit spot and resume your normal watering, keeping the soil lightly moist. It's crucial to keep it away from drafts from doors, windows, or heating vents. Once you've found its blooming spot, leave it there. Don't move it again until the show is over.
With a little consistency, you'll be rewarded with a cascade of brilliant flowers right on time for the holidays. As your plant gets older and rewards you with blooms year after year, you'll also want to think about its long-term health. Our guide on when to repot a Christmas cactus can help you determine if it's ready for a bigger home after the blooming season is done.
Pruning, Propagation, and Keeping Your Plant Thriving for Years
A well-tended Christmas cactus isn't just a plant for a single holiday; it's a living heirloom that can be passed down through generations. I've seen some that are decades old! To get that kind of longevity, pruning and propagating are your best friends. These simple techniques keep the plant healthy and full, and they let you share its beauty with others.
Pruning isn’t really about making the plant smaller. It’s about encouraging it to become fuller and more robust. A strategic trim right after the blooming season gives you a bushier plant, creating more real estate for next year's flowers. This is the secret to those incredible, cascading displays you see on mature plants.
How to Prune Your Christmas Cactus
The perfect time for a trim is about a month after the last flower fades. This gives the plant a moment to recover before it kicks into its spring growth spurt. You don't even need special tools—in fact, your hands are better than shears for this job.
Gently grab a Y-shaped stem section between your thumb and forefinger. Instead of cutting, simply twist the segment off right at the joint. This creates a clean, natural break that heals quickly and, more importantly, encourages the plant to sprout two new segments from that very spot. It's a simple way to double the branches. Just focus on removing one to three segments from the ends of the longest stems to shape things up.
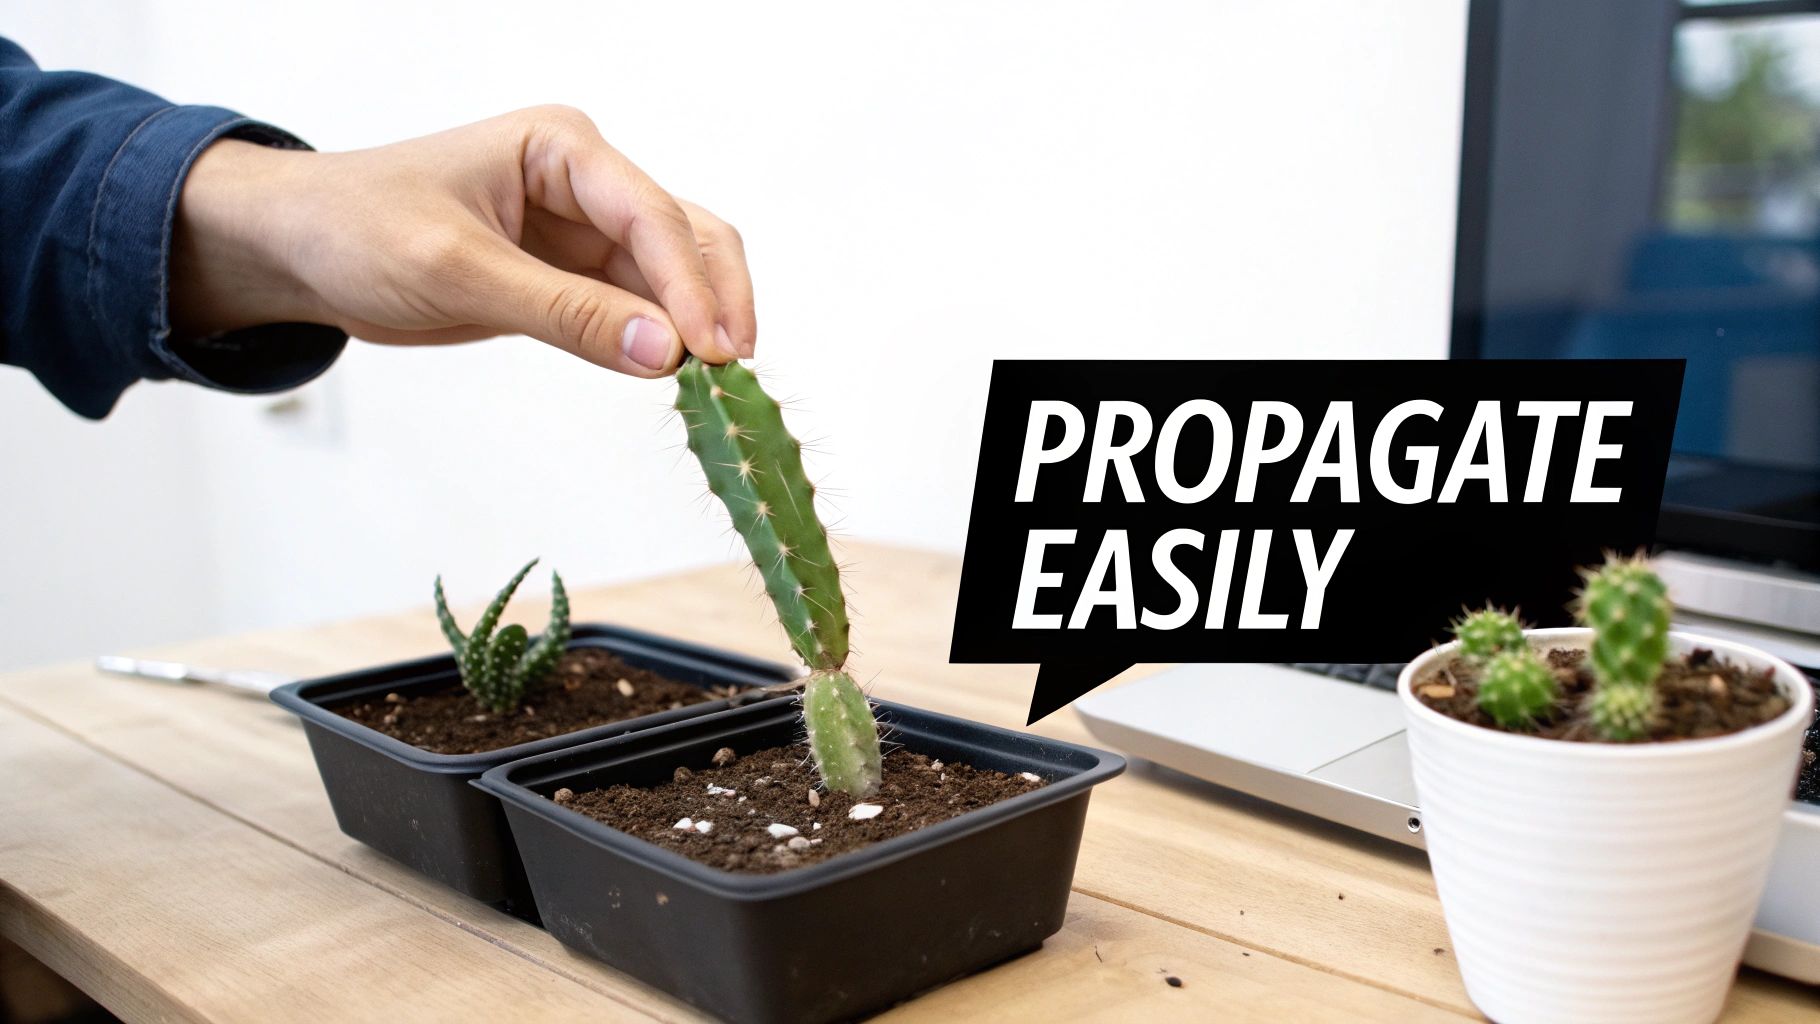
Propagating Cuttings to Make New Plants
Don't throw those pruned segments away! They are the key to creating brand new plants for yourself or to give away to friends and family. It’s one of the most rewarding parts of growing these cacti.
The most critical step happens right after you've twisted off the cuttings. You need to let them sit in a dry, cool place for two to three days. This gives the broken end a chance to "callous over," forming a protective seal. It’s a tiny step that makes a huge difference, as it stops the cutting from sucking up too much water and rotting before it can even sprout roots.
Once the ends look dry and sealed, you're ready to plant. Here’s my go-to method:
- Get Your Pot Ready: Fill a small pot with the same kind of well-draining soil your main plant is in. A mix of potting soil and perlite is perfect.
- Plant the Segments: Gently push the calloused end of each cutting about an inch down into the soil. You can fit several cuttings into one pot to start.
- Just a Little Water: Moisten the soil lightly. You want it damp, not soggy.
- Boost the Humidity: I like to place a clear plastic bag over the pot to act as a mini-greenhouse. This really helps encourage rooting. Just be sure to open it for an hour or so each day for fresh air.
- Wait for Roots: Put the pot somewhere with bright, indirect light. After a few weeks, give a cutting a very gentle tug. If you feel resistance, you've got roots!
For a deeper dive, we have a complete guide with more tips on how to propagate cactus from cuttings.
Repotting for Lifelong Health
Here’s a fun fact: Christmas cacti actually like to be a little bit root-bound. Being snug in their pot encourages them to produce more flowers. Because of this, you only need to think about repotting every three to five years, or if the plant just looks tired and isn't growing well.
Spring, long after the blooming season is over, is the ideal time to repot. When you pick a new pot, only go up one to two inches in diameter. A pot that’s too big holds excess water, which is the fastest way to cause root rot.
When you do repot, be as gentle as you can with the roots. Tip the whole plant out, move the entire root ball into its new home, and fill in the gaps with fresh, well-draining soil. Water lightly, then let it settle in for a few weeks before you go back to your normal routine.
Troubleshooting Common Christmas Cactus Issues
Even the most seasoned plant parent runs into trouble now and then. If your Christmas cactus starts looking a little off, don't worry. Most of the time, the plant is giving you clear signals about what it needs, and the fix is surprisingly simple once you know how to read the signs.
One of the most common S.O.S. signals is when those nice, plump segments suddenly look limp, wrinkled, or floppy. This is almost always about water, but here's the tricky part: it can mean both too much and too little.
So, how do you tell the difference? Your best tool is your finger. Stick it in the soil. If the mix feels bone dry and is shrinking away from the pot's edges, your plant is just incredibly thirsty. It's used up all its stored water, causing the segments to shrivel. A good, deep drink is all it needs. Let it soak for about 30 minutes from the bottom up, and it should bounce back within a day.
Decoding Limp and Yellowing Leaves
Now, if the segments are limp but the soil is soggy or feels constantly damp, you've got the opposite problem: overwatering. This is more serious. The roots are essentially drowning and have likely started to rot, which means they can't deliver water to the rest of the plant—hence the limpness.
If you suspect root rot, you have to act fast.
Gently slide the cactus out of its pot and take a look at the root system. Healthy roots are firm and white. Rotted roots will be brown, mushy, and might even have a faint, unpleasant smell.
- Trim Away the Damage: Using a clean pair of scissors or snips, carefully cut off all the mushy, brown roots. Be thorough.
- Repot in Fresh Soil: Toss out the old, waterlogged soil. Repot your cactus in a fresh, well-draining potting mix, and make sure the new pot isn't too big for the remaining root ball.
- Go Easy on the Water: After repotting, water very sparingly. Let the top inch or so of soil dry out completely before you even think about watering again. This gives the healthy roots a chance to recover and grow.
Perhaps the most frustrating issue is "bud drop." You see a plant loaded with beautiful, promising flower buds, and then one day, they start falling off before they even open. This is almost always a reaction to a sudden change in its environment.
Drastic shifts in light, temperature, humidity, or even just moving the pot from one room to another can stress the plant enough to make it drop its buds. Once your cactus starts budding, find the perfect spot for it and leave it there. Keep it away from drafts, heating vents, or a chilly entryway. Consistency is everything when you're waiting for that spectacular holiday bloom.
Identifying Pests and Discoloration
Christmas cacti are pretty tough, but they aren't immune to pests. Mealybugs are the most common uninvited guests. You'll spot them as little white, cotton-like specks, usually hiding in the joints where the segments connect.
The fix is easy for a small-scale invasion. Just dip a cotton swab in 70% isopropyl alcohol and touch it directly to the pests—it dissolves their protective waxy coating. If you're dealing with a bigger infestation, a thorough spray-down with an insecticidal soap or a neem oil solution is your next step.
Finally, what if the color of the segments changes? If your cactus is turning a bit reddish or purplish, it's getting stressed, but not necessarily in a bad way. This is often just a reaction to too much direct sunlight—basically, a plant suntan. If you prefer the classic green look, just move it to a spot with a little less intense light.
Yellowing segments, on the other hand, usually point to a nutrient deficiency or—you guessed it—a watering issue. If it's been a while since you've fertilized and the soil moisture feels right, it might just be hungry. But if the yellowing is accompanied by soft, mushy stems, it’s a red flag for root rot. Always check the soil moisture first before adding any fertilizer. Learning to spot these simple cues is the key to keeping your Christmas cactus happy for years to come.
Got Questions? We've Got Answers.
Even with the best guide, there are always a few lingering questions. When it comes to something as specific as Christmas cactus care, sometimes you just need a quick, straight-to-the-point answer.
Here are some of the most common head-scratchers we hear from our customers and fellow plant lovers, answered in plain English.
How Can I Tell Which Holiday Cactus I Actually Have?
This is a big one. It's easy to get them mixed up, and knowing which variety you have is the secret to getting it to bloom at the right time. They might all look similar at a glance, but the real tell is in the shape of their leaf segments (which are technically flattened stems called cladodes).
- Thanksgiving Cactus (Schlumbergera truncata): This is the one you'll most likely find in stores. Look for sharp, pointy, almost claw-like edges on the segments.
- Christmas Cactus (Schlumbergera bridgesii): A true Christmas cactus is a bit harder to find. Its segments have softer, more rounded, scalloped edges—no sharp points here.
- Easter Cactus (Rhipsalidopsis gaertneri): This one is the easiest to tell apart. Its segments are very smooth and rounded, and it blooms in the spring, not during the winter holidays.
Can I Put My Christmas Cactus Outside for the Summer?
You bet! A little summer vacation outdoors can do wonders for your Christmas cactus, encouraging lots of healthy new growth. The key, though, is location, location, location.
Never put it in direct sun, which will scorch the leaves in no time. Instead, find a sheltered spot with plenty of shade, like under a covered porch or beneath the canopy of a big, leafy tree.
Just keep in mind that it will dry out much faster outside, so you'll need to check the soil more often. And the most important rule of all: bring it back inside well before the first frost hits.
Help! Why Won't My Christmas Cactus Bloom?
If your cactus isn't blooming, the answer almost always comes down to its fall routine. The plant simply didn't get the right signals to start making flower buds. Don't worry, it’s usually an easy fix once you know what it needs.
For about six to eight weeks in the fall, your cactus needs two things to set buds: cool temperatures (around 50-55°F) and long nights with 12-14 hours of total, uninterrupted darkness. If it misses out on either of these, it's not going to flower.
Starting in early autumn, move your plant to a cooler room where it won't be exposed to any artificial light after the sun goes down. Seriously, even flipping on a nearby lamp for a few minutes can reset its internal clock. Cut back on watering during this period, too. Once you see tiny buds starting to form at the tips of the segments, you can move it back to its usual spot and resume normal care.
Why Do the Leaves on My Christmas Cactus Look Limp?
Limp, wrinkly segments are a classic sign of a watering problem, but it's a tricky one because it can mean two opposite things: too much water or not enough.
Your first step is to feel the soil. If it's bone-dry and pulling away from the sides of the pot, your plant is simply thirsty. Give it a good, thorough drink, and it should perk up.
But if the leaves are limp and the soil is soggy, you've probably got root rot. When the roots are damaged from overwatering, they can't absorb moisture, so the plant wilts even though it's sitting in wet soil.
Ready to start your own Christmas cactus journey or add a new variety to your collection? The Cactus Outlet has a stunning selection of healthy, vibrant cacti ready to become the centerpiece of your holiday decor. Explore our collection and find your perfect plant today!